I followed the method from my first recipe book "西点学习大百科". It's my first ever best recipe book that had help me start my baking journey years ago. I've got this website defined the Napoleon Pie.
 Sometimes I bought a ready made puff pastry to make the cake but sometimes it's a joyful thing when you've got everything homemade. Once you've got this pastry done, you would be able to make many desserts.
  Custard, whipping cream, fresh berries, swissroll sponge etc.. they're all best friends with this pastry. Just like the picture above. The base and the edges is the Mille Feuille cover with sponge, strawberry, custard and whipped cream. This might take some efforts but worth it :)
I've problem in describing the process but please let me know if you need further clarification.
Ingredients:120g unsalted butter (melted)
70g plain flour
60g high purpose flour (bread flour)
1/4 tsp salt
1/4 tsp sugar
70ml cold water
Extra high purpose flour for dusting
How I made it:

- Mix water, salt and sugar in a large bowl. Shift in 1/3 of the plain flour and 1/3 of the high purpose flour until everything well combine. Gradually add in melted butter and mix thoroughly. Mix in all the remaining flour and use a scraper to mix until everything combine. Pour the mixture out on a floured work surface and knead. You might need to flour your hand and the surface while working out. The texture will become smooth and just a bit sticky then stop the kneading process and cling wrap the dough. Place it in the fridge for overnight.
- On a floured knife and work surface, cut a cross mark on the dough as four portions.(picture 2)
- Roll out each portion. (picture 3)
- Place a 1.5cm thick butter at the center of the pastry. (picture 4)
- Fold the edges together. (picture 5)
- Cling wrap the pastry and place it in the fridge for 1/2 hour before the next step.
- Roll out the pastry at 60cm longish shape. (picture 7)
- Fold into three layers (picture 8). Roll out and fold in again. Put it back to the fridge if you feel the pastry become sticky. Continue when it firm up again.
- Make a mark on the pastry with your finger to remember the numbers of roll out process (picture 9).
- I've rolled out and folded in for 6 times.
- Cling wrap the dough and place in the fridge until firm and ready to use (picture 11). The pastry could be stored in the fridge for 1 to 2 days or freeze for a week.
- Preheat the oven to 200'C. Roll out the pastry at a floured work surface and place on the back of a baking tray. Prick the pastry with a fork to make holes. (picture 12)
- Bake in the oven for 10 minutes then place a wire rack of the of the pastry and press down gently (picture 13) on the pastry and continue the baking for 10 - 15 minutes at 180'C until golden brown.
- Cool on a wire rack (picture 14)
- The pastry is ready to be used.


 I came across a website with a very good
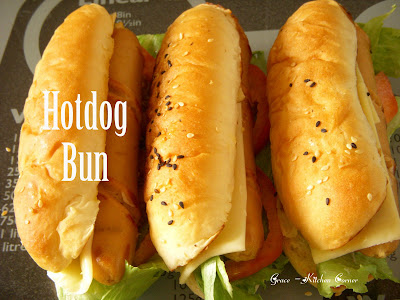
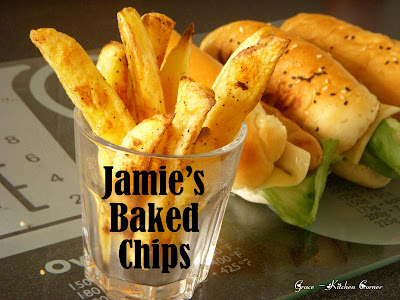 I would like to introduce this baked chips which is a recipe from Jamie Oliver. If you've came across English chips before, you might know there are quite thick and fatty chips. This version is slightly different as it's baked in the oven rather than deep fry. So, if you are thinking to reduce the fat and calories, this might be suitable for you and it taste great!
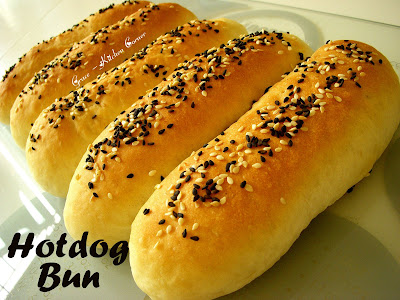
 Recipe for 5 hotdog bun or burger buns:


