Friday, December 23, 2011

No Bake Choco Pinwheels


Easy and very easy recipes are my choice and if it comes with choco flavor, I am the first person stands in the queue to prepare and enjoy it. I bookmarked such an easy choco recipe from Priya of Bon-Appetit a month ago. When I prepared at home, it disappeared immediately just after my preparation. Try it, you and your kids like them much and you can see them disappeared in no minute.


Basic Information:
Preparation Time: 20 minutes
Idle Time: 30-60 minutes
Makes: 20-25 pinwheels


Ingredients:


For outer layer:

Marie/Mcvities/Tea Biscuits - 20 nos (half packet approx)

Cocoa Powder - 1 and 1/2 teaspoon

Sugar - 1 tablespoon

Milk - As required to make dough


For inner layer:

Dessicated coconut/Dry coconut - 1/2 cup

Sugar - 1/4 cup (+/- according to your taste)

Butter - 2 tablespoons

Cardamom powder - 1/8 teaspoon


Method:


1) Using the mixer/coffee grinder/food processor, powder the biscuits first and towards the end, add cocoa powder and sugar. Make a smooth powder. Sift it so that it makes the rolling process easy.


2) Add little quantity of milk at a time and make soft dough. Knead it for 3 minutes and keep aside.


3) Combine all the ingredients given for the inner layer and mix well. Keep it aside.


4) Now divide the dough(as said in step 2) into two and roll one divided dough into a round shape like chapathi using the rolling pin.


5) Spread the dry coconut mix evenly (as said in step 3) over the rolled dough. Leave some space at the ends.

6) Roll tightly like a cylindrical shape and seal the cracks if any.


7) Cover it using a cling wrap/aluminium foil and repeat the above steps with remaining dough. Keep both the rolls in freezer for 30-60 minutes to set.

8) After 30-60 minutes, cut them into small pinwheels with the width of half inch.


9) Serve chill.


Note:

1) If you do not have dessicated coconut, cream the sugar and butter and use as inside layer. In fact, this gives very perfect shape than pinwheels using dessicated coconut.

2) Mix some coffee powder to the milk to get some coffee flavor.

3) You can store it for 2 days but I bet it can not stay at your home for 2 days.

Spicy Nut Rice - Blogging Marathon #11

Blogging Marathon Week 11, For this edition of BM i have chosen Lunch Box Dishes. Spicy Nut Rice, an healthy combination of nuts and spices to give an flavorful n tasty Lunch Box Recipe.
Ingredients
1 Cup Cooked rice
1 tbsp Coriander Seeds
1/2 tsbp Peanuts
1/2 tbsp Gram Dal/Chana Dal
1 tbsp Flaxseed meal
4 nos Walnuts
4 Red Chillies
a small gooseberry sized tamarind
Salt to taste
For Seasoning
1 tbsp Gingely oil
1/4 tsp mustard seeds
1/2 tsp urad dal
hing a pinch
curry leaves a few
Method
  • Spread the Rice in a plate, fluff it with a spoon and add a tsp of Gingely oil and toss.
  • Dry Roast Coriander seeds, Peanuts, Gram dal, Red Chillies and walnuts separately.
  • Take all the ingredients in a mixer along with flaxseed meal, tamarind, salt and grind it to a powder. 
  • Heat oil in a pan, add tempering ingredients one by one, pour it over the rice and toss it well. 
  • Add the required amount of ground powder to the rice and mix well.
  • Serve Warm with Dry-Curry of your Choice.
Check out the Blogging Marathon page for the other Blogging Marathoners doing BM#10


Thursday, December 22, 2011

Decorating Cutout Cookie Dough

In an episode of Family Ties, Mallory predicts that heaven is like an enormous mall which never closes. I remember thinking that was a frightening concept (long before it was possible to lose an eye over the latest Xbox). As a cookie lover, I envision heaven as one big bakery with a vast variety of sprinkles and cookie cutters.


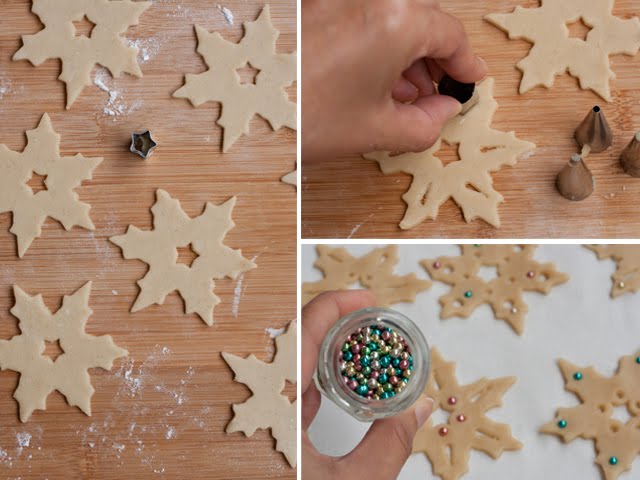
This time of year, I always set aside time out to make cutout cookies. I love decorating them with royal icing, but know it's possible to create exquisite cookies without ever pulling out a piping bag. All it requires is some cutters, sprinkles and your untapped creative juices. The first step is to cut a basic shape from your cookie dough. Here I used a snowflake. Then think about ways to embellish the basic pattern. Reach for your smallest cutters, but also other objects (thinking outside the box).


I've long admired the intricately decorated snowflake cookies that are displayed in high-end home goods catalogs. This year, I set out to recreate them. Using a tiny star cookie cutter, I marked the center of each cookie. Then I pressed piping tips around the star shape. The rounded tips produce a delicate circular pattern. You can also make circles using the tip of a straw. Look around your house and find a way to re-purpose other objects. Create patterns with the tongs of a fork. Use the tip of a knife.

Once you have cut patterns into the cookie dough, use sprinkles to add texture and color. I pressed shimmery dragees into my snowflake cookies to catch the light.

A few years ago, I bought a patterned rolling pin at a super sale. The design reminded me of Dr. Seuss's books. I'm pretty sure it's meant for imprinting fondant, but I decided to test it out on cookie dough. I coated it with a generous layer of flour, dusted it off a touch and then pressed in over some dough I had rolled out. It left a wonderful whimsical pattern. I used cutters to shape cookies out of the patterned canvass. The lesson? If you have any tools for decorating fondant, don't overlook them!