There is a great new post by Sal Vaglica on This Old House Online called How to Use Contractor Referral Websites that is a perfect adjunct to my article on finding, interviewing and selecting contractors on my web site.
Sal's article details how to use the services such as Angie's List and Servicemagic to find a contractor when you don't have the usual resources like coworkers, friends and family to ask for referrals.
I tried a couple of the services myself (Servicemagic and its predecessor, ImproveNet), years ago, to market my services before I discovered the (wonderful) world-wide-web.
I found that paying for "leads", when the service was unwilling to include detailed budget questions in their questionnaire, was not very fruitful for me.
My clientele tends to be a small percentage of the overall population of consumers looking for kitchen design services. They are mostly middle class people with difficult kitchens that require a lot of remodeling and a designer with a "fresh eye". They also put more dollars into their projects than the average because of their complexity. Thank GOODNESS the web came along!
I think the referral sites work better for contractors though. It gives them a chance to connect with new potential clients who aren't friends of friends, or are new in town.
I also think Angie's List is well worth the cost because you get to read other consumers' thoughts on working with the individual or company AFTER they have had the experience...and the comments are unsolicited.
It is certainly de rigeur to ask a contractor, or anyone else you are contemplating hiring, for references; however you must understand that those references are going to be among their happiest clients.
I like to ask for a reference who had problems on the job as well. That way I'll learn how the individual performs under adverse conditions and problem-solves.
So, if you (and all your friends) are new to remodeling and looking for a contractor, try Angie's List. I bet you'll be glad you did.
Peggy
Tuesday, August 19, 2008
and we're back
We've been slightly more productive than it seems here on the blog. Sorry about the lack of posting; I was surprised to find out how many of you are checking back frequently. Thanks. We do have a good excuse - unfortunately, I don't think I can muster up the enthusiasm to talk about it here. Instead, I'll post this picture we got today.

Project Rowhouse has the porch light on.
Back to the renovation -
The brick-exposing is a multiple step job. We are now scrubbing the bits of plaster that were left clinging to the brick. This is the messy, labor intensive part. The original plan was to use variously sized wire brushes - imagine much stronger versions of the brush you use to clean your grill after making kabobs. The pros to using this brush is control and precision, the cons are that it sucks in many different ways. Speeding this up was imperative. I knew I could find a more productive tool.
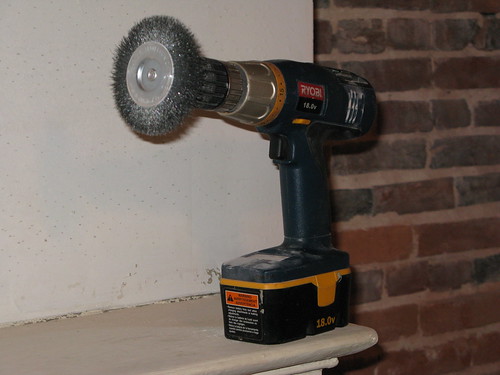
This drill attachment did the job amazingly well. I was initially nervous that it would tear through the mortar. While I managed to gouge a few areas slightly, it's very easy to control once you get the hang of it.
A tip: as you switch arms, hands, kneeling positions - always keep in mind the direction the drill is spinning. Switch it up so that it's shooting the brick shrapnel away from you.
We're thrilled with the results - the portion on the left is before the scrubbing.
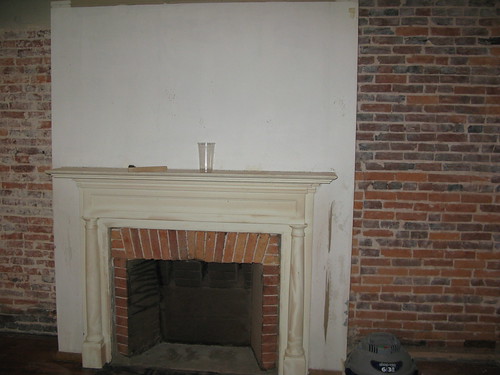
To keep the dust down as much as possible, I hung walls of dropcloth from ceiling to floor creating impressively thick dust clouds. I highly suggest this - along with well-fitting goggles and dust mask. Anyone familiar with this process knows I am not exaggerating here.
We also:
hung a new porch light (and allowed that hanging plant to barely hold onto life):
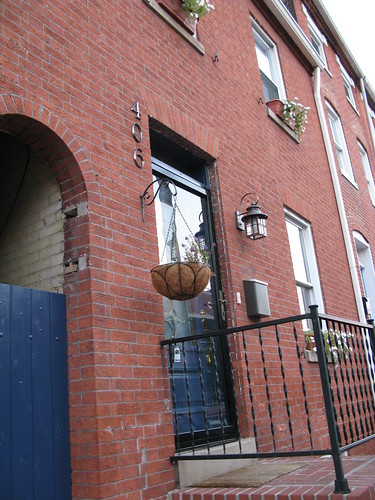
painted the doors (a darker blue than the back door... I like this one better); and removed the cover that used to be above the salleyway door:


Ta-Dah.
Project Rowhouse has the porch light on.
Back to the renovation -
The brick-exposing is a multiple step job. We are now scrubbing the bits of plaster that were left clinging to the brick. This is the messy, labor intensive part. The original plan was to use variously sized wire brushes - imagine much stronger versions of the brush you use to clean your grill after making kabobs. The pros to using this brush is control and precision, the cons are that it sucks in many different ways. Speeding this up was imperative. I knew I could find a more productive tool.
This drill attachment did the job amazingly well. I was initially nervous that it would tear through the mortar. While I managed to gouge a few areas slightly, it's very easy to control once you get the hang of it.
A tip: as you switch arms, hands, kneeling positions - always keep in mind the direction the drill is spinning. Switch it up so that it's shooting the brick shrapnel away from you.
We're thrilled with the results - the portion on the left is before the scrubbing.
To keep the dust down as much as possible, I hung walls of dropcloth from ceiling to floor creating impressively thick dust clouds. I highly suggest this - along with well-fitting goggles and dust mask. Anyone familiar with this process knows I am not exaggerating here.
We also:
hung a new porch light (and allowed that hanging plant to barely hold onto life):
painted the doors (a darker blue than the back door... I like this one better); and removed the cover that used to be above the salleyway door:
Ta-Dah.
The Simple Ubiquitous Vengaya Rava Upma or Flavoured Semolina with Onion?
THE SIMPLE UBIQUITOUS VENGAYA RAVA UPMA (or FLAVOURED SEMOLINA with ONION ?!)

INGREDIENTS:
Semolina – 1 cup
Onion – 1
Green chilly -1
Ginger – 1 inch piece
Curry leaves – a few
Salt -1 tsp
Cooking oil – 3 tbsp
Mustard seeds – ½ tsp
Black gram dal -1 tsp
Bengal gram dal – 1 tsp
Turmeric powder – 1 pinch
Lime – 1
Coriander leaves – a few
METHOD:
1. Chop onion, ginger and green chilly finely and keep aside.
2. Set 3 cups of water along with salt to boil on one flame.
3. Meanwhile heat oil in a wok and add mustard seeds.
4. When it splutters add black gram dal and Bengal gram dal and roast till they are golden in colour.
5. Add green chilly, ginger and curry leaves and sauté.
6. Add chopped onion and sauté till it is pink in colour.
7. Add the turmeric powder and the semolina and roast till it gives out a pleasant aroma.
8. Now pour the boiling water into the rava mixture, stirring continuously, and blend well. Note: If you do not stir, you will end up with a lumpy texture, and sometimes the rava inside the lumps will not even be cooked.
9. Cook on low flame until all the water is absorbed and the upma starts leaving the sides of the wok.
10. Squeeze out the lime juice into the upma, while it is still hot and pliable and blend well.
11. Switch off the flame and leave it covered for a few minutes.
If you don’t mind adding ghee, then you can add it in Step 2, and boil along with the water, or add it in step 8 while stirring the upma.
'Upma' stems from 'uppu' or salt and 'maav' meaning flour. In most South Indian languages upma stems from 'salt & flour' -- 'Uppu-maavu', 'Uppu-Pindi', 'Uppu-hittu'. One of the easiest and quick breakfasts to make, rava or semolina upma is very healthy and rich in iron content. Homes and restaurants are ever ready to serve this simple delicious dish at any time of the day. There are hoards of variations to this simple recipe by changing the vegetables and spices – add tomatoes, carrots and peas; use Bisibele masala, or Sambar powder; emphasize any spice; include some grated coconut …the possibilities are endless.
Upma traditionally made with semolina, is now being made with a number of other cereals. It’s quite common these days to see upma made with broken wheat, rice flakes, oats, and even bread. My children overseas use Cous Cous, Polenta, Quinoa and a variety of Pastas as well to make upma. With some imagination you can come out with many more.
A copious amount of good quality ghee added to upma is key to making it really tasty, although not a healthy option. Given below is a very simple and basic upma recipe, without ghee.
SIMPLE VENGAYA RAVA UPMA
INGREDIENTS:
Semolina – 1 cup
Onion – 1
Green chilly -1
Ginger – 1 inch piece
Curry leaves – a few
Salt -1 tsp
Cooking oil – 3 tbsp
Mustard seeds – ½ tsp
Black gram dal -1 tsp
Bengal gram dal – 1 tsp
Turmeric powder – 1 pinch
Lime – 1
Coriander leaves – a few
METHOD:
1. Chop onion, ginger and green chilly finely and keep aside.
2. Set 3 cups of water along with salt to boil on one flame.
3. Meanwhile heat oil in a wok and add mustard seeds.
4. When it splutters add black gram dal and Bengal gram dal and roast till they are golden in colour.
5. Add green chilly, ginger and curry leaves and sauté.
6. Add chopped onion and sauté till it is pink in colour.
7. Add the turmeric powder and the semolina and roast till it gives out a pleasant aroma.
8. Now pour the boiling water into the rava mixture, stirring continuously, and blend well. Note: If you do not stir, you will end up with a lumpy texture, and sometimes the rava inside the lumps will not even be cooked.
9. Cook on low flame until all the water is absorbed and the upma starts leaving the sides of the wok.
10. Squeeze out the lime juice into the upma, while it is still hot and pliable and blend well.
11. Switch off the flame and leave it covered for a few minutes.
If you don’t mind adding ghee, then you can add it in Step 2, and boil along with the water, or add it in step 8 while stirring the upma.
Decorate with coriander leaves and enjoy with chutney or a cup of curd.
Subscribe to:
Posts (Atom)


