Saturday, August 30, 2008

Molagai bajji with special monsoon chillies


In my parts of Kerala, we get a special variety of chilly during monsoon. These are very mild ones and ideal for bajjis. Locally this variety is called as "Polla Molagu" (Polla meaning hollow) I am not sure if this variety is available elsewhere. The usual long , green chillies are not very common. Hence chilli bajjis too cannot be found in any eateries here except during some exhibitions. More than the fares at the exhibition, youngsters are attracted to the bhajjis and big Mumbai papads smeared with masala powder.


When these monsoon chillies arrive, then molagai bhajji is the much sought after street food here, perfect for the rains. Even though I make this at home, the one we get from a hotel here is simply divine. I just can't recreate that taste at home. Here is how I make them


For batter

2 cups besan flour

1/2 cup idli/dosa batter

a pinch of cooking soda

salt

1/2 tspn chilli powder

water

Oil for frying


For the filling


2 tblspn tamarind paste

a pinch of hing

salt

pinch of red chilli powder

Mix all the filling ingredients in a bowl


Parboil the chillies in hot water for 10 minutes. This will soften the skin of the chillies. Usually the seed inside is not removed, since the chillies are much on the milder side. Make a 1 inch slit from the top. Carefully spoon in little of the filling.


Mix all the ingredients for the batter and add water to it. The consistency of the batter should be like the idli batter. Then only the batter will stick to the chillies.


Heat a kadai with oil. When the oil is hot, dip the chilly in the batter, carefully drop them in the oil. After few minutes, gently flip them. When it is golden brown, remove them with a slotted spoon and drain on absorbent paper.


I feel molagai bajjis need no accompaniment other than a cup of hot steaming tea/cofee


P.S. This variety of chillies are good for making thayir molagais. (Curd chillies)

Kattarikai Masala - Stuffed Egg Plant or Brinjal

KATTARIKAI MASALA - STUFFED EGGPLANT
My attai (father’s sister) was the first one in the family to go ‘out’ and live in the ‘North’ after her wedding. Later she came back with a wealth of knowledge about the north Indian dishes as she was an eager learner of variety cooking. We had never heard of ginger-garlic paste or grinding of onion for the masala until aunty started preparing for the family. She also loved to prepare a great many varieties of stuffed dishes. One among them is the stuffed eggplant. Mother too prepared this dish but at the most she would add only a small piece of cinnamon to the masala. She usually stuffed the vegetable with spice and then steam it in pressure cooker before lightly sautéing it in a little oil. My brother’s wife microwaves the stuffed eggplant and then sautés it in little seasoning. I like my aunt’s method as it keeps the vegetable intact, yet juicy.

INGREDIENTS
Eggplants – 10 (small)
Bengal gram dal- 2 tbsp
Coriander seeds – 2 tbsps
Asafoetida – 1 pinch
Red chillies – 12
Cinnamon – 1 inch
Onion -2
Tomatoes – 1
Salt -1 ½ tsp
Oil - tbsps
Cumin seeds -1/4 tsp

METHOD:
For the masala:
1. Peel onion and cut them into four pieces.
2. Chop tomato finely and keep aside.
3. Heat a drop of oil in a pan and add asafoetida., followed by the Bengal gram dal, coriander seeds, cinnamon and red chillies and roast till it is golden in colour.
4. Cool the roasted ingredients and dry grind them into a fine powder.
5. Now add the cut onions and salt to the powder and again run the mixer.
6. There is no need of adding water while grinding, since the juice of onion is enough to make a paste.

Prepare the eggplant
1. Wash and carefully slit eggplants from the top. Make eight segments (4 cuts), but leave the segments on the stalk, and don’t cut so far that the segment breaks away. Refer the diagram for the cuts.
2. Stuff the vegetable in the middle and in between the segments with the ground paste.
3. After stuffing all the eggplants heat oil in a pan.
4. Add cumin seeds and the chopped tomatoes.
5. Add a pinch of salt and sauté for one minute.
6. Arrange the stuffed eggplants in the pan and turn each of them gently to coat with oil.
7. Cover with lid and cook on low fire until it is done.
8. When the vegetable becomes tender remove lid and keep sautéing till it absorbs all the spice.
Enjoy with rice, chapattis or bread.

Friday, August 29, 2008

Ama Vadai - Fried Lentil Ball

AMA VADAI
Ama vadais and payasam are indispensable dishes in all festivals and feasts. Though there are varieties of vadai recipes. Ama vadai occupies the foremost position in a menu prepared for any festival. Ama vadai is prepared by frying a flattened ball of ground lentil and spice. Children and adults alike love to pop the vadais into their mouth, as and when they are fried. Many a time I have been left with no vadais to serve on the leaf at meal time. Old people love it when soaked in Rasam or Mor Kuzambu.

I have heard of a gigantic cousin of my grand father who used to consume a basketful of vadais at one sitting as he chatted with his friends. Just imagine the plight of the old aunt who had to grind the enormous quantities of the vadai dough in those ‘pre- electric mixer’ days.

INGREDIENTS:
Bengal gram dal - 2 cups
Red chillies - 4
Ginger – 2 inch piece
Asafoetida – 1 pinch
Curry leaves – a few
Fresh grated coconut- ¾ tea cup
Salt – 1 1/2 tsp
METHOD:
1. Soak Bengal gram dal with red chillies for half an hour.
2. Grind ginger, asafoetida and the soaked chillies with little of the soaked dal.
3. Now add the remaining soaked and drained dal and salt to the mixer and grind into a coarse mixture. Do not add water, as the mixture should be thick.
4. Mix in the grated coconut, and shredded curry leaves to the dough mix well. The vadai mixture is now ready.
5. Heat oil in a kadai.
6. Take a ¾ tablespoon of the vadai mixture and shape into a small ball, with your hand.
7. Keep the ball in the palm of one hand, and lightly press and flatten with three fingers of your other hand, giving the vadai the shape of a turtle’s back.
8. Drop it in hot oil and immediately decrease flame. Frying on a high flame, will cook the outer parts faster, and leave the insides uncooked.
9. When the vadai looks cooked, increase heat and continue to fry till it is golden red in colour.
10. Vadais can be cooked in batches of six or eight.
Enjoy them plain or savour it with mint or coconut chutney. While this is the traditional vadais prepared for festivals and as prasadam (offering for the Gods), one can add chopped onion, grated carrot, mint leaves and so on as per preferences.

Traditional Pidi Kozukattai and a Masala Variation - Rice and Lentil Dumpling

PIDI KOZUKATTAI - Rice and Lentil Dumpling The monotonous groaning of the stone grinder was enough to announce that we were going to be served with either rice uppuma or pidi kozukattai for the evening tea. The aroma of the rice and lentil being ‘broken’ would never fail to kindle a craving, even as we hurriedly got ready to return to school after a full meal. As we went out to the back yard to wash our hands, we would see Lingamma sitting with one leg outstretched, and turning the iron handle of the stone grinder, Her body - waist upwards- seemed to rotate along with the circular grinder as she went forward and backward, while feeding the ‘machine’ with rice and lentil with the other hand. This dance continued till she finished with all the rice which fell out from between the two circular stones, crushed or broken to the required texture. We always took a pinch of the flour and threw it into our mouths and rushed out, never waiting to listen to Lingamma’s whining for having moistened the flour.

PIDI KOZUKATTAI is yet another steamed rice & lentil dish that is filling as well as easy on the digestive system. It is very good for children as it is double cooked. ‘Pidi’ means ‘hold’ in Tamil. The dumplings are made taking some mixture in the palm of one hand and ‘holding’ or pressing it lightly with your fingers, as shown in the photograph.

This was dish was prepared often, especially when Machakottai or Avarekalu ( field beans) were in season. The addition of “kalu” or field beans to any recipe lends a distinct aroma to the dish which is adored by one and all.
INGREDIENTS:
Rice – 2 cups
Mung Dal (split green gram dal) – ¼ cup
Salt – 2 tsps
Red chillies – 4
Asafoetida – 1 pinch
Mustard seeds – ¼ tsp
Curry leaves – a few
Oil - 1 ½ tbsp
METHOD:
1. Dry grind rice and mung dal to the texture of semolina.
2. Wash the broken rice and dal mixture lightly, drain and set aside.
3. Heat oil in a pan and add asafoetida and mustard seeds.
4. When the mustard splutters add the broken red chillies and the curry leaves.
5. When the chillies become crisp, add 4 cups of water, and the salt, and bring to a boil.
6. When the water in the pan is boiling, add the rice and lentil mixture and stirring continuously until it forms into a thick uniform mass. Now switch off the flame.
7. While the mixture is still warm, dip your hand in ice cold water and take a fistful (pidi) of the hot cooked mass and quickly press it into an oval ball or kozukattai.
Note: You need to do this quickly, so that you do not burn your hands! If the mixture becomes cold, it is difficult to mould the mixture, and the k0zukattais will break.
8. In the same manner, shape all the mass into several kozukattais.
9. Steam the kozukattais in a pressure cooker without weight, for 10 – 15 minutes.
Serve hot kozukattais topped with a dollop of ghee, along with any gojju or chutney.
MASALA PIDI KOZUKATTAI VARIATION
My grandchildren love the kozukattais made with Basmati rice.
To make masala kozukattais, the same procedure as above is followed, after substituting the rice and seasoning. Use a good flavourful basmati rice instead of normal rice. Omit the asafoetida, red chillies, mustard and curry leaves. Instead use chopped green chillies and ginger shreds for the seasoning. Cumin seeds instead of mustard seeds will create a different flavour. One cardamom, one clove and a very small piece of cinnamon can be powdered (or a pinch of garam masala) and added while seasoning.
This kozukattai can be served with any North Indian masala sabji such as navaratna kurma, or paneer butter masala and so on, which are usually prepared with Palav or Rotis.

Price Book Changes!

We’ve Updated Our Price Book!

No matter what the “experts” tell you, we are in a recession. (If it looks like a duck, walks like a duck… )

Because we are ALL hurting, we decided to re-vamp our entire price book. The boss and I spent more than 20 man-hours going through every item in our price book. We lowered almost every price!

Now, plumbing is still expensive; don’t expect something that would have cost $500.00 before to only cost $50.00 now! That’s not going to happen. But it might be $425.00, maybe even a little lower!

Our prices were not outrageous before. We have a saying here, “Pigs get fed, hogs get slaughtered.” By this we mean that we just want to make enough money to turn a profit. We are trying to build relationships; partnerships, if you will. We need to make money, but we don’t need to get it all from ONE customer!


To give you an example of one of our prices. The normal price to test a backflow device is usually either $49.00 or $59.00! That's it! (There are a couple of things that could make it be more than this, but normally this is the price per device!)


Something totally off the subject...

I am sure many of you watched the Olympics! I know my wife and I did. We have Tivo, so we were able to record a lot of it and watch it when we wanted to. (How did we ever do without Tivo? We have told friends about it, and they all said things like, “That’s nice”, but you could tell they didn’t care. Then they got Tivo and they absolutely love it!) It was tough though, I watch Sports Center almost every morning and I couldn’t watch during the Olympics. I didn’t want to find out what happened before I got to watch it. What fun would it have been to watch the basketball gold medal game if I already knew who was going to win? (Okay, I had STRONG suspicions who was going to win, but I didn’t KNOW!)

Thursday, August 28, 2008

Vegetable Pulao & Malai Kofta for MEC Potluck

There are many ways to prepare a vegetable pulao. I have taken an easy route here - No grinding/powdering involved. Just chop some veggies, add the whole spices and shop bought garam masala for flavor. And an yummy pulao is ready. Can things get easier than this ?

For vegetable pulao,

Basmatic rice - 1 cup
A handful of sprouted peas. You can use fresh/dried ones too.If you are using dried ones, soak them for 6 hrs.
Cubed mixed vegetables - 1 cup (Use any veggies of your choice)
onion -1

ghee/oil- 2 tblspn

crushed cloves- 3 nos

cinnamon - 1 stick

cardamom - 2 pods

turmeric - a pinch

green chilly(slit) - 3 nos

garam masala - 1 tspn

salt


Wash and soak rice for 30 minutes in 2 cups of water.

In a microwave safe bowl, MW oil/ghee for 30 secs at high power. Add the spices - cinnamon, cloves and cardamom and MW for 2 minutes by stirring once in between.

MW for a minute after adding chopped onions. Add the peas, vegetables and rice along with the soaked water. Add a pinch of turmeric, salt and garam masala. Cover and cook for 15 minutes. Stir in between.


Allow to stand for 5 minutes for it to cook completely. Adjust the cooking time according to your oven.
If you want, you can heat a teaspoon of ghee and add half teaspoon of garam masala and mix to the cooked pulao for more flavor

Malai kofta is made fully in MW. So no deep frying the koftas required.

For koftas

grated paneer - 100 gms

Big potato - 1

1/2 tspn corn flour

green chillies - 3 nos (chopped)

chopped coriander - 1 tbspn

chat masala powder - 1/2 tspn

salt and pepper to taste

For gravy

onion paste from 2 onions

tomato puree- 1 cup

ginger-garlic paste - 1 tbspn

ghee- 1 tbspn

garam masala - 1/2 tspn

cornflour - 1 tsp

salt,black pepper and red chilli powder to taste

For garnish

Fresh cream and chopped coriander leaves - 1 tbspn each

Preparing koftas

Cook the potato in MW for 5 minutes. Don't forget to prick on the potato with a fork before you cook.

Mash paneer, boiled potato and corn flour. Mix the rest of the ingredients and make a smooth dough. Form into small balls and shape them. Place in MW safe flat dish and MW at high power for 2 min. Reposition the koftas more than once.


Preparing gravy

In a MW safe bowl, MW ghee for 30 secs. Add onion,ginger-garlic paste and MW at high power for 4 min.

Add tomato puree, garam masala, salt, black pepper and red chilli powder for 4 mins.

Mix cornflour in little water with out any lumps. Stir into the gravy. Add one cup of water. Cover and cook for 4 mins

Add kofta and MW for one min. Garnish with coriander and fresh cream

Yummy malai kofta is ready. Using non- deep fried koftas did not make much of a difference.

Vegetable pulao and malai kofta is joining the potluck at Srivalli's.


Wednesday, August 27, 2008

Blueberry Bagel

Here is my second attempts on bagel. The recipe had a bit different from the previous bagel I've made. Not only its blueberry flavour but it's made by milk to produce a different texture.
I made big bagel this time and used it for our main course sandwich. I blended some fresh blueberry into paste to produce a blueberry flavor bagel. It smell very blueberry and soft yet chewy. But I still have problem shaping it into a perfect round shape.
I heard a guru said those commercial bagel was form by a round mould but for homemade we've got to use our fingers to make it. Anyway, I don't mind the rustic one but still trying the best to make as round as I can.

Recipe makes four big bagels:

Bread flour 250g
Caster sugar 20g
Salt 1/4 teaspoon
Yeast 3g
Milk 95g
Blueberry paste 50g
Unsalted butter 5g

Method:
  1. In a large bowl of a stand mixer combine all the ingredients. knead dough with the dough hook until elastic, about 10 minutes on a low speed.
  2. Divide the dough into 4 portions and shape each piece into a tight balls. When all the balls are shaped, place dough in a lightly greased bowl, cover with plastic wrap and let proof for 40 minutes.
  3. Get ready a large bowl of 1L hot water with 5g sugar and 1/2 teaspoon of syrup. Preheat the oven to 180'C.
  4. Once dough balls have rested, poke a hole through the center of each dough ball with your fingers. Stretch out the dough into a ring and make sure the hole is slightly larger than you want the finished bagel to have, as the bagel will expanding during the baking process. Let bagels proof for about 30 minutes.
  5. Drop the bagels into the boiling water at about 90'C. Boil for 10 second at each side then place on a parchment-lined baking sheet.
  6. Bake for 20-24 minutes, until golden brown.

Semia Idli - Steamed Vermicelli Idli

Semia Idli - Steamed Vermicelli Dumpling
My mother is an excellent and innovative cook. Even to this day at the age of 78, she prepares my – I would rather say everybody‘s - favourite dishes whenever an opportunity arose. Mysore Rasam with coconut milk for my eldest daughter, Aval Dosai for my second daughter, Bisibelebath for my son, Sojji for my nephew and an endless list of dishes for her really big big family .
I always relished her Semia Idli but had never bothered to find out about the know hows of its preparation. Last week when I had called her up, she enthusiastically enquired about the blog and asked me if I had written about my “favourite” dish. Immediately I got the recipe from her and tried it out for the first time and lo…it turned out to be a delicious hit!

INGREDIENTS:
Vermicelli – 2 cups
Curds – 1 cup
Salt – 1 ½ tsp
Green chillies – 3
Fresh ginger – 1 inch piece
Fresh coriander - a few leaves
Carrot gratings – ½ cup
Mustard seeds – ½ tsp
Cooking oil – 2 tbsps
METHOD:
1.Add grated carrot, salt, finely chopped green chillies and ginger to the curd and mix well.
2.Heat oil in a pan and add mustard seeds.
3. When it splutters add the vermicelli and fry till it is golden red in colour.
4. Add the fried vermicelli to the prepared curd, while it is still hot .
5. Mix well and leave it to soak for 10 minutes.
6. Grease the idly moulds with a drop of ghee and spoon the curd- vermicelli mixture into each mould.
7. Since it does not flow like the normal idly batter , spread out the mixture into each mould with the help of a spoon.
8. Steam the idlis in the pressure cooker without the weight for 12 minutes.
9. Allow the steam to settle down and then remove the idlis.

Semia idlies are very light and delicious. Enjoy with your favourite chutney or sambar.

Tuesday, August 26, 2008

Soya Vaangi Bhath & Sprouted Horsegram Salad

Soya chunks/nuggets was all that I knew of the soya products some years back. In those days, I was not aware of the nutritious benefits of the same. Soya chunks was not cooked in my home. I was introduced to these spongy balls at my friend T's house, who is my childhood friend and am happy to say we still maintain that friendship, in the same spirit, as was years before. (Touch wood). These soya chunks/meal makers as it is also known, was cooked regularly at her home. I developed a liking towards that. So when I started cooking on my own, I tried to include them in my menu too. Also for all the health benefits attached to soya.

During the weekends (Sat/Sun), me and my sister spent the whole day at T's house playing. T has a sister too. Four of us will play, like there is no tomorrow. We were not bored of playing the same set of games, every weekend. They had a huge backyard with many trees, literally making a roof over the backyard. In one summer vacation, we even managed to build a small house using bricks and clay. That house did not have any roof. So its just small walls partitioning each room. One of T's elder cousin was also there on vacation. He helped us in digging the clay and mixing with water etc. T's mother got us small earthen vessels and we cooked rice and sambhar in the newly built house . It was real fun. Our house did not last more than a week, since it could not with stand the heavy summer downpour. It was all fun for the 12 yrs old kids at that time.


Now to the recipe

Recipe source:Mallika Badrinath


Rice - 1 cup
Soya chunks - 1 cup

Small violet brinjals - 3 nos
Onion - 1
Ginger-garlic-chilly paste - 2 tspn
Lemon - 1

For masala

Cinnamon - 1" piece
Cardamom - 3 pods
Poppy seeds/Khus Khus - 1 tspn
Dried coconut/Kopra - 2 tblspn


Dry roast the spices together. If you don't have dry coconut, fry the dessicated coconut till brown.

Soak the soya chunks in hot water for 15 minutes. By then it must have puffed up well. Squeeze and wash in cold water twice. Crumble the soaked soya granules to break them up. Don't powder it. Cut brinjals into small cubes. Pressure cook the rice and spread on a plate to cool.

Heat oil n a pan and season with mustard, urad dhal and curry leaves. Fry onion till brown. Add cut brinjals, ginger-garlic-green chilly paste. When the brinjals are tender, add the soya granules, salt and cook. You can sprinkle little water if required. Add cooked rice, the ground masala powder and mix well. Remove from fire. Stir in lemon juice. Garnish with coriander leaves


For the salad,

Sprouted horse gram/kolli/kulith - 1 cup
Shredded cabbage, grated carrot, chopped onion and tomatoes - 1 1/2 cup
2/3 slit green chillies
Hung curd - 1 tblspn
Salt
Pepper powder
Chaat masala
Olive oil - 1 tspn

Wash and soak the horse gram overnight. Drain and tie the gram in a muslin cloth and hang it near your kitchen window. Make sure moisture is maintained in the hung cloth by dripping few drops of water at regular intervals. By next day morning, it must have sprouted well. It takes longer time for the horse gram to start sprouting when compared to whole moong.


Pressure cook the sprouted gram for 2 whistles. It doesn't turn mushy on pressure cooking. Mix everything in a bowl and serve the protein rich salad with the pulao. This salad can be eaten as a meal by itself . It is very filling.


Soya Vaangi Bhath is my entry for
JFI-Soya, hosted by Sia of Monsoon Spice.

Monday, August 25, 2008

Eggless Sponge Cake and a Reminder for the Fundraiser

As many of you already know, Srivalli has started a fund raiser for the cause of Anita Lakshmi, 26 , who is a mother of two kids aged 6 and 3. Lakshmi is suffering from a serious heart problem which requires immediate surgery. After trying all possible sources, for some kind of monetary assistance for the surgery and not getting any favorable response, Valli has started this fundraiser. So far only 13% of the target amount of $15,000 is raised.


This is an opportunity for all of us to come together and give Lakshmi a life and to give back those two kids, their mother. So, dear readers, please chip in your donation securely through Paypal using the Chip in widget at Valli's blog. The donated amount goes directly to Laskhmi's account. Valli has also mentioned that the amount will be paid to the hospital directly and will not be given to Lakshmi or her relatives. If you wish to send your donation through cheques/DD in Indian Rupees, please mail at lakshmi.fundraising@gmail.com to get the details. I also request my readers to kindly spread the word and also to inform Valli of any charitable organisations which will be ready to contribute for Lakshmi's cause.


Now coming to the recipe, this is adapted from Tarla Dalal's.


All purpose flour/Maida - 1 1/4 cup

Baking powder - 2 tspn

Baking soda - 1/2 tspn

salt - 1/4 tspn

Milkmaid - 1/2 tin

Melted butter - 1/4 cup

Vanilla essence - 1 tspn

water/soda - 1/4 cup

Sift the dry ingredients together. Mix flour mixture, milkmaid, melted butter, vanilla essence and water/soda. Pour into a greased and dusted cake tin. Preheat the oven and bake at 180 C for 15 minutes and at 150 C for 15 minutes.


The cake is ready when it leaves the sides of the tin and is springy to touch. When ready, take out from the oven and leave for 1 minute. Invert the tin over a rack and tap sharply to remove.
The cake was very moist and fluffy.


I am sending this sponge cake to Hima, who has started the Sunday Snacks event and has selected the theme Bake It for the current edition.


Illatharasi has passed me "Just Nice Photos - Beautiful Site" & "2008 Best Blog Darts Thinker" awards. Thank you Illatharasi for your thoughtfulness.


P.S. With this post, I have hit a century. Thank you all for your support.

Homemade Kaya

I've been using this recipe for years and now I would like to share with you. I suppose many of you might have your own recipe already but just a sharing. I used 2/5 of the ingredients from the original recipe just for both of us.

I like this recipe because it don't need to be stirred all the time so that I can continue with other stuffs while cooking it. With the double boiling cooking method I always got a very smooth kaya. I reduced some sugar from the original recipe as I found it's too sweet for me. But it's very depends on you.

The Sixties, Sobre Las Olas and Raja's Special!

The Sixties, Sobre las Olas and Raja's Special

It was the early sixties. Father took us on long drives almost every day, inspite of his multifarious activities. His blue coloured Companion van was perfect for our family. The four of us brothers and sisters fitted well in the long back seat, while father drove with mother by his side. My brothers monkeyed around by jumping back into the open boot and hopped back to the back seat as and when they liked.

A picnic dinner at the grand Lalitha Mahal Palace (it was not a hotel at that point of time!)which stood at the foot of Chamundi hills was a frequent agenda. Mother packed our favourite sambar rice and curd rice, with vadams (rice crispies) and pickles for the much awaited dinner. But the high light of the dinner was the special parcel and a crate of Fanta Orange which we picked up from the Sports club on our way.

There was a sprawling lawn and a grand fountain in front of the palace. On the opposite side huge flights of steps landed us in different levels of gardens. The domes on the lamp posts at frequent intervals shed cool dim light like the moon. We parked our Companion Van in front of the stairs and carried all our paraphernalia to one of the landing which again had a huge fountain in the center.

Father took out the gramophone from the boot and turned the handle to play our favourite records. We loved to dance to “Chinkey Butterfly” which was a fast number, and Over the Waves or Sobre Las Olas which was a waltz. Father joined us in the fun while mother filled up our dinner plates. The lone watch man or the occasional wild wolves which came down the hill did not interrupt our merriment. The cool breeze and the privacy in the expanse of nature, under the star lit sky is most unforgettable.

And then it was time to open the parcel ! All of us pounced on it to take a big helping of the Raja's Special and Peas on Toast. Raja's Special of yore is masala nuts of the present day. It seems this was the Raja’s favourite dish prepared at the Sports club, and hence goes by the name Raja's Special.


INGREDIENTS:
Peanuts – 500 gms
Onion – 2
Green chillies -3
Salt – 1 tsp
Lime – 1
Cooking oil- 1tsp
Mustard seeds – ¼ tsp
Fresh chopped coriander leaves -1/2 cup
METHOD:
1. Heat oil in a pan and add mustard seeds.
2. When it splutters add finely chopped green chillies.
3. Add peanuts and roast till they crack, and allow to cool.
4. Add finely chopped onions, salt and the juice of lime.
5. Shake all ingredients in a vessel covered with a lid to blend well.
6. Top it with coriander leaves.

Munch along as you watch your favourite movie, or as you watch this quaint version of Over the Waves or Sobre Las Olas!

Sunday, August 24, 2008

Little Burger

This is a fantastic recipe from Jamie Oliver's "Jamie's Dinner". After followed his recipe I don't feel want to buy those frozen burger anymore. Nothing can be better than making your own homemade burger and it taste much better than those frozen one. His recipe is simply the best!

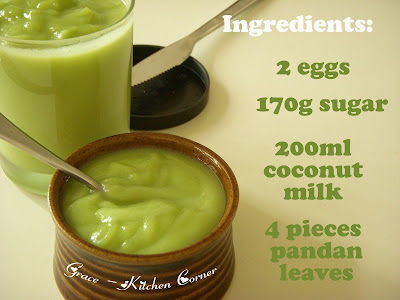
This suppose to be a large burger but I intentionally make it into small portions to match with the little homemade buns I've made.

Ingredients for the burger: (Makes Approx. 8 Burgers)
(book reference: Jamie's Dinner)

1kg minced pork (I used lean minced pork)
1 onion, peeled and finely chopped
Olive oil
A pinch of cumin seeds (powdered)
1 tablespoon coriander seeds (powdered)
sea salt and ground black pepper
a handful of freshly grated parmesan cheese
1 tablespoon english mustard (I used D-jon mustard)
1 large egg
115g breadcrumbs (I used fresh bread and pulse in a food processor)

For the Buns: (makes 10 buns)

300g bread flour
7g yeast
9g sugar
6g salt
4g milk powder
190g (1 egg + water)
20g butter

Method for the burger:
  1. Fry the onion with some olive oil in a pan for few minutes until softened. When the onion completely cool down, mix it to the meat.

  2. Add the rest of the ingredients and mix well. (if the mixture is too sticky, add a few more breadcrumbs). Shape the meat into the eight fat burgers and place on a tray with greaseproof paper.

  3. Sprinkle some bread crumbs on top of each burger and press down gently. Chilled in the fridge for 3 - 4 hours.

  4. Fry the burger in a little oil on medium high heat for few minutes, depending on the thickness of the burger you shape. (here is a little different from the book, I grill it at a preheated oven 190'C for 15 minutes)

Method for the buns:

  1. Knead all the ingredients with a dough hook for 15 minutes. Proof for 40 minutes then divide it into 10 portions.

  2. Let it rest for 15 minutes. Then shape it into little bun and proof for another40 minutes or double in bulk.

  3. Bake in a 190'C preheated oven for 15 minutes.

Saturday, August 23, 2008

Godumai Dosai - Wheat Flour Pancakes

Godumai Dosai -
Wheat Flour Pancakes

One of the quickest and easy dosas to make is the tasty, light and lacy Godumai dosai. Although not popular with my children, I would resort to making Godumai dosai when I ran out of ideas. Menu planning was never easy with three children with different tastes. It needed to appeal to their taste buds, and yet be nutritious. On then occasions when I made this dosai, I had to resort to cajoling, or using distracting techniques like telling stories, and sometimes even being very stern to make them eat. Sometimes, by the time the three kids ate, I would really feel enough is enough!

I don’t recollect how, but I started the practice of making dosais shaped like flowers, stars and so on, after which they would readily eat up these dosais, with a little sugar or curd. I still remember the kids sitting in a row in the kitchen and demanding dosais shaped like a house, rabbit, bird, lion and so on! I would be a sport and try to fling the thin godumai dosai batter into these shapes. Children are anyway very imaginative. They would happily see these shapes, in the odd shaped dosais I made!


Ingredients
Wheat Flour - 1 cup
Water - 4 cups
Salt - to taste
Chopped corriander - 1 Tbsp
Curry leaves - a few
Jeera (Cumin seeds) - 1/2 teaspoon
Asafoetida - a pinch
Ghee / Oil - 1 tsp per dosa
Optional:
Grated ginger - 1/4 tsp
Grated coconut - 1 Tbsp
Finely chopped onion - 1 Tbsp

Method
1) Make a batter of thin consistency by mixing all the ingredients. The consistency should easily pour-able. Regular pancake or dosai batter consistency is too thick for this dosai. This should be watery enough, such that a ladle poured on the tava (pan) quickly spreads out on its own.

2) Heat a tava or pan. A non-stick pan is the easiest to use. Wipe a bit of oil or gree on the pan, using a halved onion. This helps spread the oil evenly all over the pan.

3). Stir the batter so that it is well mixed. Take a ladle-full and pour into the tava. If the consistency is right, the batter will spread out on its own, or you can swish the nonstick pan to help spread it.

4) Air bubbles will rise and break giving a porous appearance to the dosai.

5) Turn down the flame to sim. You can add a little ghee around the dosai and inside a few of the pores.

6) There is no need to turn over the dosai to cook it. Leave it untouched, until the bottom becomes reddish brown and crisp, and the Godumai dosai easily slides off the pan onto a plate!

You can serve this with a variety of chutneys. However I relish this with the adee rasam or the thick part of rasam!

Sathumaavu Urundai /Multigrain Balls


In South India, health drinks are available which is a powder made from roasted multi grains and few nuts flavored with cardamon. Some brands sell the roasted grains and nuts, packed in individual packets and sold as one unit. And all we have to do is to powder them. I find the roasted ones cost effective than the powdered one. I usually buy the roasted one and get it powdered from a near by flour mill. For breakfast, we usually have the sathumavu kanji along with the tiffin.


The idea behind making the balls is from a traditional sweet - Poruvalangai, which was a common sweet in most Iyer households. Its almost a forgotten sweet now. I do make Poruvalangai once in a while. Since this powder is always in stock, it is easy to make these urundai/balls with the instant powder at hand. Once my hubby got the powder instead of the grains that we usually buy. I made this using the store bought sathu maavu. Since it has all the ingredients in it, only jaggery is required to prepare this.


Sathumaavu/Multi grain flour - 2 cups

Powdered jaggery - 1 cup

The store bought flour has cardamom added to it. So no need to add any extra flavor.

Mix jaggery in just enough water to immerse, simmer on low heat till it dissolves. Strain & boil again till it reaches the soft ball consistency. The consistency is reached when ½ teaspoon of syrup added to 1 tbsp water, can be rolled into a soft ball. Remove the syrup from fire.

To make balls, take 1 cup of powder in a wide bowl, add syrup & mix well simultaneously with a ladle. Care should be taken while adding the syrup. The quantity of syrup added, should be just enough for the whole flour to get coated and the mixture should resemble bread crumbs.


While hot, form small balls. Don’t make the balls very tight. If the syrup added is more, the balls will turn chewy. As you bite into the ball, it should be powder like. I warn you, its not easy to bite into, as in ordinary laddus. This is a bit hard kind. And the fun of eating those balls lie in that.


Note: There is a possibility for the syrup to caramelize as you finish the first batch. To keep the syrup in the same consistency, keep the syrup vessel in a double boiler on a low flame.

This nutrition packed flour with jaggery makes an ideal sweet for all. All our traditional sweets have taken care of the nutrient requirements and the health concerns. With out any ghee or any other fatty ingredient, an yummy sweet is ready. Jaggery is always recommended in place of the white sugar. This sathumaavu urundai is a favorite in my house, that it gets over in no time.

This guilt free healthy sweet is making to Mythrayee's Sweet Series which calls for Chikki and Laddu for the current edition.


Sunita has asked to send a dish with our favorite spice. Cardamom, the most commonly used in my kitchen, is my favorite. So this goes to the Think Spice:Think Favorite anniversary edition.


Whole grains being a good source of calcium, I am sending this to Sangeeth's Eat Healthy - Calcium Rich event.

Friday, August 22, 2008

Raisin Stuffed Apples for MBP

When Aparna announced MBP, I knew what I wanted to make. So for this month's MBP, no patroling done. Ever since Uma posted raisin stuffed apples, I wanted to make it. I tried with one apple. Even though I reduced the cooking time(3 minutes) since its only one and she had used 3, it slightly got over cooked. But it was tasty. I almost followed her recipe to T. Only change I made was, I added powdered sugar and cardamom powder in place of cinnamon. Do visit Uma's post for the detailed recipe with step-by-step pics


This goes to the MBP-Fruit Fare, hosted by Aparna, which is the brainchild of Coffee

Thursday, August 21, 2008

Bagel 犹太面包 (贝果)

I remember the first bagel sandwich I had was at the Heathrow Airport. Till now, I still remember the chewiness of the bread.
There are many recipes of bagel and different ways to form the bagels into a donut shape. Some people likes to roll the dough into a “snake” and pinching the ends together. The other way is to shape the dough into tight balls and poke a hole through the center then stretch out the dough into a ring with fingers.

Since this is my first attempts I would like to go for the basic and simple one. This rustic bagel I made didn't looks very round in shape.
By the way, did you realize that there were actually five bagels in the above image?

These aren’t the giant-sized bagels as I purposely make it for breakfast or a snack.

I am now looking for whole wheat bagel recipe. Would you please share with me if you've got one. Cheers!

Method:

  1. In a large bowl of a stand mixer combine all the ingredients. knead dough with the dough hook until elastic, about 10 minutes on a low speed.
  2. Place dough in a lightly greased bowl, cover with plastic wrap and let proof for 1 hour.
  3. Get ready a large bowl of hot water and preheat the oven to 400F.
  4. When dough has risen, divide into 10 portions. Shape each piece into a tight balls.
    When all the balls are shaped, let the dough rest for 30 minutes covered with a clean dish towel.
  5. Once dough balls have rested, poke a hole through the center of each dough ball with your fingers. Stretch out the dough into a ring and make sure the hole is slightly larger than you want the finished bagel to have, as the bagel will expanding during the baking process.
    Let bagels rest for about 10 minutes.
  6. Drop the bagels into the boiling water. Boil for 2 minutes on the first side, then flip and boil for an additional minute.
  7. Transfer bagels to a clean towel to drain for a moment, then place on a parchment-lined baking sheet. Egg wash the boiled bagel bake for 20-24 minutes, until golden brown. (I garnished it by adding some sesame seeds)