Tuesday, January 31, 2012

Kaalu Dosae - Indian Crepe With Field Bean Topping


 KAALU DOSAE 

We enjoy a kaalu dish at least once in two days during the avarekai season.The legume is adored for its distinct aroma. Even a simple dish like upma becomes flavoursome and adorable when a handful of kaalu is thrown into it. 

Kaalu Dosae is a delicacy and it is a sure - fire  hit when served hot. Topped with a dollop of fresh butter and a variety of chutneys to go with it, savouring  kaalu Dosae is nothing but  the seventh heaven!

 I used Puri - puffed rice - while grinding the batter for  dosae  along with rice. The dosaes were very soft and spongy and the edges were crisp and golden in colour.


 INGREDIENTS FOR THE PURI DOSAE BATTER

Raw rice ( Sona Masuri ) - 1 1/2 cups 
Par boiled rice ( idly rice ) - 1 1/2 cups 
Puri ( Puffed rice ) - 1 cup 
Fenugreek seeds - 1/2 tsp 
Bengal gram dal - 1/2 tsp 
Sour curds - 1 cup 
Salt - 2 1/2 tsps 
Sugar - 1/2 tsp 

METHOD 

1. Wash and soak all the ingredients except curd, salt and sugar for two hours. 
2. Grind the soaked ingredients adding little water into a smooth and thick batter. 
3. When the batter is smooth add the sour curds,salt and sugar and grind for another three minutes. 
4. Store the batter in a big vessel giving it space for rising. 
5. Cover with a lid and leave it in a warm place for fermenting overnight. 

TO PREPARE THE KAALU FOR THE TOPPING 


INGREDIENTS 

Hituku Bele ( Peeled and deskinned Kaalu ) - 1 cup 
Finely chopped green chillies - 2 tbsps 
Finely chopped fresh coriander - 2 tbsps 
Finely chopped fresh ginger - 2 tbsps 

METHOD 

1. Boil the hituku bele in just enough water adding a pinch of salt for ten minutes. 
2. Drain excess water if any and spread it out on a kitchen towel. 
3. Mix all the chopped ingredients with the now dry hituku bele kaalu

TO MAKE THE KAALU DOSAE 

1. Heat a tava and grease it evenly with oil using the cut surface of a halved onion. 
2. Pour a table spoon of batter on the tava to check the consistency of the batter as well as the heat of the tava. 
3. When the batter is poured on the tava , it should spread into the shape of a dosae by itself. Small holes should appear on top of the dosae when it is cooked. When you turn over the dosae,  the flip side should look golden in colour. The dosaes will come out well after two or three small ones are tested. 
4. Adjust the consistency of the batter adding water if necessary,and pour one large ladle of batter on the hot greased tava
5. Dribble oil all around the dosae and wait for small holes to appear on top. 
6. Spread a scoop of the prepared kaalu on top of the still cooking dosae, and press them down with a spatula so that they get embedded on the dosae


7. Cover with a lid and cook for two more minutes on low flame. 
8. Remove lid and check if the dosae is cooked well on the top. 
9. Cooking on the flip side is not necessary. 
10. Gently remove the cooked Kaalu Dosae on to a plate and increase the heat before pouring the batter for the second dosae


Enjoy the hot Kaalu Dosae with a dollop of fresh butter and your favourite chutney.

Monday, January 30, 2012

Caramelized Onions and Swiss Cheese Sandwiches

I grew up at a time when food companies were elbowing their way into homes across America. Like many children of the 70s & 80s, I can still hum the catchy jingles that were sandwiched between The Flintstones and Looney Tunes. Our family ate Indian scratch cooking nearly every night. But with persistent pestering, I was allowed Oreo Cookies, Apple Jacks, and other packaged foods.


During the day, my sister and I ate in the school cafeteria where most meals were cooked from scratch. One of the lunch ladies was Italian-America and once a week ate her family's recipe for spaghetti with meat sauce.


I always looked forward to field trips. which called for a packed lunch. I got to sneak a peek at the things my classmates ate at home. Many kids retrieved baloney sandwiches from their lunch box. I longed to bite into a layer of the oddly uniform meat that tasted like hot dogs. But mom was fiercely opposed to baloney. She always made me a ham sandwich topped with lettuce, a slice of tomato and a spoonful of mustard.


I rarely eat meat now. So my days of ogling at baloney dangling in the refrigerated aisle are over. When I want to warm up this time of year, I make French onion soup. If I'm too busy to cook up soup, I toast some French bread and layer it a heaping spoonful of caramelized onions and Swiss cheese.


Saturday, January 28, 2012

Sourdough

Going to be trying a sourdough starter, will post how its going.

Friday, January 27, 2012

Chocolate Cheese Macaroni

A relaxing afternoon..Lazing on the couch..Watching food network and watch the pretty and overly expressive (it is nice though) Giada De Laurentis cook with mascarpone cheese, ricotta cheese, pasta and yummy cake laden with chocolate. My stomach rumbles and craves for cheese and chocolate (though I kept reminding myself that I need to work out and lose some fat). Finally something flashed in my occasionally brilliant mind and EUREKA!!

I went into the kitchen and picked exactly 3 ingredients from the pantry. And a delicious Friday night dessert was ready in less than 15 minutes. Lets take a look at how this yummy delicacy is made.


Ingredients:
(Serves 2)

Elbow Macaroni - 1 cup
Nutella Chocolate and Hazelnut spread - 2 tbsp
Ricotta cheese - 1/3rd cup


Method:

  • Add the elbow macaroni in a pan of boiling water and cool till it is Al-dente. Drain the pasta and transfer it into a bowl.

  • Add 2 tbsp of Nutella and mix well. The Nutella will melt with the heat of the pasta and become a creamy sauce.

  • Finally add the ricotta cheese and mix well.

  • Add chopped walnuts and garnish. Serve it warm or chill it and serve it cold.
  • Enjoy your Chocolate Cheese Macaroni!!

Notes:
  • You can use any kind of pasta to make this dish.
  • You can alter the amount of Nutella and cheese depending on your taste.
  • Add a pinch of salt and a tsp of ghee or melted butter to the pasta water so that the pasta does not stick together.
  • You can add chopped nuts of your choice.

Pachai Poondu Takkaali Chutney - Raw Garlic Tomato Chutney


PACHAI POONDU TAKKAALI CHUTNEY 

We love to visit our native village as often as possible. The hospitality showered on us by the ever smiling Rukmini is one of the great attractions besides the pristine environment and the serene temples of the village. Rukmini's preparations especially the Chettinaad dishes are real tongue ticklers.I always return home with more knowledge handed down by her regarding the secret ingredients and the special tips which make the everyday dishes more tastier.

During our latest visit, Rukmini treated us to a delicious Idly - Vade - Saambaar breakfast along with Pachai Poondu Takkaali Chutney. Initially the rawness in the garlic hit our palates strongly. But towards the end of our breakfast we were surprised to see that we had polished off all the chutney that Rukmini had prepared along with the fat and fluffy idlies.

 Raw Poondu or garlic is recommended by doctors as a cure for various illnesses. It is also considered as a general health tonic. For people who abhor raw garlic, savouring Pachai Poondu Takkaali Chutney with the morning breakfast is the best way to imbibe its benefits without much fuss!

You can always use a strong mouth wash after breakfast if you do not like the lingering garlic flavour!


INGREDIENTS

 Raw garlic ( Peeled ) - 1/2 cup 
Tomatoes ( Chopped ) - 1/2 cup 
Red chillies - 4 
Salt - 1/2 tsp 
Sesame oil - 2 tsps 
Mustard seeds - 1/4 tsp

METHOD

 1. Grind the peeled garlic, chopped tomatoes, red chillies and salt together into a smooth paste without adding water. 
 2. Heat oil in a pan and add the mustard seeds. 
 3. When the mustard seeds splutter add the ground paste and immediately switch off flame. 


 4. Mix thoroughly and store in a cup. 


Yesterday we enjoyed Pachai Poondu Takkaali Chutney with Raagi Muddae. It was a deadly combination!

Thursday, January 26, 2012

OATS VEGETABLE KANJI

This is Oats Kunji. Health wise, it is nutritious and good for people with ailments like Diabetes and Hypertension. This is a fine breakfast dish for elders as well as for small babies. We can add so many vegetables to our likings. But cauliflower, drumsticks, root vegetables like potato, yam and ladiesfinger are not suitable to add in this kunji. Carrot, peas, baby corn, tomatoes, a little raddish, a little palak, French beans and onions will enhance the taste. Thin kunji is effective in healthwise.


OATS VEGETABLE KANJI [ஓட்ஸ் காய்கறி கஞ்சி]


Ingredients:

Oats- 4 to 5 tbsp
Finely chopped Tomato-1
Finely chopped onion-half
Small garlic flakes-5
Finely Shredded ginger-a pinch
Finely chopped coriander- 1 tbsp
Salt to taste
Oil- 2 tsp
Fennel seeds or cumin seeds- 1/2 tsp
Turmeric powder- half sp

Procedure:

Heat a pan and pour the oil.
Add the fennel or cumin seeds and when they splutter, add the onion with the other vegetables and fry nicely until they are well cooked and the oil floats on top.
Pour 5 cups of water with enough salt.
Immediately add the oats.
Mix well and let it boil for a few minutes until the oats are cooked.
The delicious oats kunji is ready now!

Variations:


If fennel seeds are used, a few mint leaves can be added when frying the vegetables. It will give a delicious touch. 1 or 2 teaspoons of Shredded coconut can be added in the end. 2 tbsps of coconut milk can be added in the end to give an extra taste. But it is not good for elderly people. Instead of vegetables, cooked chicken pieces can be added along with onion, tomato, garlic, mint and ginger.


Wednesday, January 25, 2012

Podalangai Curry/Padavalkai Palya - Snake Gourd Curry


PODALANGAI CURRY/
PADAVALKAI PALYA  

Snake gourd is known as Podalangai in Tamil and Padavalkai in Kannada. Ayurveda and Naturopathy point out to the various health benefits of Snake gourd. Snake gourd is suitable for preparing delicious koottu, curry, morkuzhambu and other dishes. 
The addition of crushed pepper gives Podalangai curry / Padavalkai palya a special flavour. 


INGREDIENTS 


Snake gourd - 1 ( 4 cups when chopped )
Sesame oil - 1 tbsp
Mustard seeds - 1/4 tsp
Asafoetida -1 pinch
Peanuts - 2 tbsps
Coarsely crushed pepper - 1/2 tsp 
Cumin seeds - 1/2 tsp 
Curry leaves - a few 
Fresh coconut gratings - 2 tbsps 
Salt - 1/4 tsp

METHOD 

1. Chop the tender snake gourd into medium size pieces. 
2. Heat oil in a pan and add the mustard seeds. 
3. When the mustard seeds splutter add asafoetida. 
4. Throw in the peanuts and fry till they crack. 
5. Add the crushed pepper followed by cumin seeds. 
6. When the fried pepper gives out a pleasant aroma , add the curry leaves, chopped snake gourd and salt. 


7. Stir well, cover with a lid and cook on low flame. The tender vegetable will cook in its own juice. 
8. Stir once in a while till the snake gourd becomes uniformly soft. 
9. Open the lid, increase heat and gently cook the curry till dry. 
10. Switch off flame and mix in the fresh coconut gratings. 


 Enjoy the juicy and peppery Podalangai Curry / Padavalkai Palya with your favourite meal.

Tuesday, January 24, 2012

Getting there!


 The adorable assistant!

    Phil is back to "normal" working hours again since the family arrived home.  They are admiring the new look in their home.   The bamboo floors are about complete in the family room, making the room look warm and classy.  The fireplace will receive a new facelift, the final details will be taken care of and Phil will move on to the next lucky client.  We love happy clients and we love becoming like family to so many.  Keep watching for the final pictures!

Monday, January 23, 2012

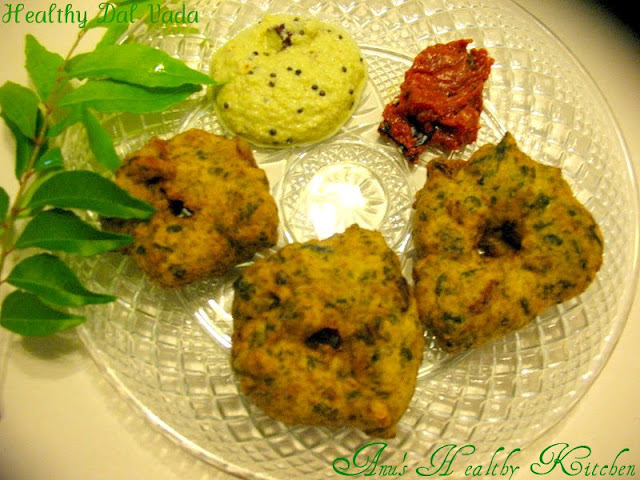
Healthy Lentil/Dal Vada with Collard Greens, Urad and Moong Dal


This is a deep fried recipe which usually I prefer to avoid as much as possible. When I decide to deep fry then I make sure that the focus is over the ingredients being more healthy, in that way I don't feel guilty about eating it once in a while. I know we should not feel guilty about eating deep fried food once in a while but keeping it healthy gives a lot more satisfaction and happiness. Another reason I added greens to the recipe is because Mom always used to make dal vada with drumstick greens and we used to love it. Well we used to eat with a odd combination, with mutton curry....but believe me or not it tasted so good.

Ingredients:
------------
1 cup Urad Dal
1 cup Yellow Moong Dal
2 cups Collard Greens (I used frozen and thawed)
2-3 Green Chilies chopped
1/4 inch Ginger chopped
1 Sprig Curry Leaves
1 Onion chopped
Salt to taste

Method:
---------
1. Soak Urad and moong dal in water for about 2 - 3 hours.


2. Drain the water and save it for later. 
3. In a kadai add oil for deep frying and bring it a medium-high heat.
4. Meanwhile in a mixer/blender add the dal, green chilies and ginger, give it 3-4 pulse until the dal is slightly coarse paste.
Note: We don't need to add water as the collard green are frozen and will have lot of water in it. If you are using fresh greens then you can add the water in which the dal was soaked.


5. Now add the greens and curry leaves and grind it to a coarse paste, I just pulsed few times, in between scraped the sides and got the desired consistency. 
6. Transfer this dla mixture into a large bowl.
7. Meanwhile sprinkle salt over the onions and mix a little bit and keep it for about 20 mins.
8. Now squeeze the water from the onions. 
Note: This will remove the excess water from onions, so that when we make the vada it stays crispy and does not get soggy.


9. Add the onions to the dal mixture and mix well and check for salt and add more if you need.
10. I reserve the water in which dal is soaked, for dipping/wetting my hands to make vada shapes.
Note: Make sure that the oil is ready by dropping a small drop of the thick vada batter. If it rises as soon as you put into the oil, it means the oil is ready, else if it stays at the bottom of the kadai and takes time to come up to the top, then you need to wait few more minutes.
11. Now add the vadas one by one slowly and make sure you don't over crowd the kadai. Cook each side for about 5 mins or until it turns golden brown.
12. Flip once to the other side and cook again for about 3-4 mins. 
Note: Make sure you don't flip too many times as the vada will absord more oil and will not cook properly.


13. Remove the vadas to a plate lined with paper towel, so that it will remove the excess oil.


14. Repeat the steps 11-13 until all the batter is used.


15. I served these vadas with Coconut Chutney and Spicy Tomato Pachadi.

You Might Also Like:

Sunday, January 22, 2012

Sandesh / Cottage Cheese Fudge


Sandesh is for my last day of Blogging marathon. I thought, I already have 7 recipes for 7 days but today when I sat for blogging, I found that the recipe for last day was missing in my drafts. Immediately, I prepared this easy sweet dish. It is easy too if you have fresh paneer at home. It became around 6 PM in the evening by the time I finished this recipe and the natural light had vanished. So, I was forced to take pictures under the florescent light. Hope you like the pictures and enjoy the dish as well. Here you go...


Basic Information:
Preparation & Cooking time: 45 - 50 minutes
Makes: 8 nos


Ingredients:


Paneer - 1 cup, crumbled

Granulated sugar - 1/4 cup

Cardamom - 2 nos

Saffron streaks - a small pinch

Pistachio nuts - 1 tablespoon, roughly crushed


Method:


1) Mix sugar and cardamom together and make a powder of it using a coffee grinder or mixer. Keep it aside.

2) Knead the crumbled paneer for 5-10 minutes.


3) Towards the end of kneading, add sugar, cardamom mixture and saffron. Try to make a small ball now using a pinch of paneer. If you are able to make a smooth ball, then you can proceed with the next step. Otherwise, continue kneading.


4) Heat a pan in a medium heat. Add the kneaded paneer.


5) Cook it on low heat by constantly stirring it. Initially the paneer looks like thick dough and doesn't form a shape as shown in the picture.


6) After 15-20 minutes, you can see the paneer becomes thick, starts coming together and doesn't stick to the pan. At this time, remove from heat.


7) Allow it to cool for a while. After some time, knead it again for 5 minutes.

8) Divide them into equal balls and make desired shapes.


9) Garnish it with pistachio nuts. Keep in refrigerator for some time and serve chill.


10) When it is cooling down, it will become hard a bit.


Note:

1) Try to prepare sandesh using fresh paneer. If you don't have paneer, try replace it with ricotta cheese. It will also work out.

2) Do not heat after the paneer forms a thick dough. Otherwise, you will ended up with paneer crumbles which you can't use for making shapes.

3) At the same time, do not allow the sauteed/cooked paneer to sit for long time. Make shapes when it is slightly warm. This helps making perfect shapes.

4) You can also add milk powder/corn starch before cooking the paneer in pan. But I felt adding corn starch made the Sandesh litter harder than usual. So, I skipped adding it this time while preparing it.


I'm linking this recipe to Srivalli's Blogging Marathon #12 under the theme of paneer. Check out what others are cooking by clicking it here.

Red Carrot Pickle


RED CARROT PICKLE 


My family has a craze for pickles. Apart from the long lasting spicy and oily pickles, instant pickles are also a hit for their distinctive tang and the crunch. This is my mother's recipe for an instant Carrot pickle which can be easily prepared. Its shelf life is limited to a couple of days but it is a colourful party delight. 


INGREDIENTS

 Red carrot ( Laal gaajar or Delhi Gaajar) -1 (one cup when chopped)
 Lime (the size of a ping pong ball) - 2 
Green chillies - 3 
Fresh ginger - 2 inch piece 
Salt - 1 1/2 tsp 
Sesame oil - 2 tbsps
Mustard seeds - 1/4 tsp
Fenugreek seed powder - 1 pinch 
Asafoetida - 1 pinch 
Turmeric powder - 1/4 tsp

 METHOD 

1. Wash, peel and cut carrot into slightly thin and long pieces. 
2. Slit the green chillies lengthwise and cut them across similar to the size of the carrot pieces. 
3. Peel and chop fresh ginger likewise. 
4. Immerse the whole lime fruits into boiling water, switch off flame and cover it with a lid. 
5. When thoroughly cooled remove from water and wipe them dry. 
6. Place the fruits on a clean and dry plate or on a cutting board and cut them into small pieces using a very sharp knife. Take care to preserve the thick juice with the cooked pith, which may spurt out of the lime while cutting. 
7. Pick out the seeds using your hand, because filtering will remove the essential pith of the lime along with the seeds. 
 8. Heat the oil in a pan and add the mustard seeds. 
9. When the mustard seeds splutter add asafoetida and fenugreek seed powder. 
10. When the powders emanate a pleasant aroma mix in the turmeric powder. 
11. Stir in the chopped ginger, green chillies and carrots. 
12. Finally stir in the chopped lime along with the pith and the juice. 


13. Mix in salt and switch off flame. 
14. Allow to cool and store in a small pickle jar. 


You can relish this addictive tangy and crunchy Red Carrot Pickle immediately with your meal. Refrigerate after use. Mangai inji ( a variety of  ginger with mango flavour ) can also be used instead of normal ginger for its special flavour.