Saturday, October 31, 2009

Gulab Jamun - ICC Challenge for Month of October, 2009

Gulab Jamuns, a staple sweet in my household (or should i say in every household) for any festival. Not only it tastes yummy, it was easier to make. All these days it was MTR/Priya/Gits Gulab Jamun Mix, which dominated. But After ICC this month, chuck all those readymade mix out.


I followed the recipe of Indo's blog, yeah man!!! making Gulab jamuns from scratch, it was lot of fun!!!! i can gurantee that!!!!!!!!!!!

Ingredients
Whole milk - 4 litres
Maida (all purpose flour) - 1/2 kg
Curd (yogurt) - 1 tbsp
Baking soda - 1 tsp
Sugar - 2 litres
Lemon - 1/2

Ghee - 2 cups for deep frying. I used normal Cooking oil.

Method
To Make Khova
In a wide mouthed heavy bottom pan add the milk and heat it in a medium flame (add a couple of stainless steel spoons into the milk to avoid burning)
Reduce the milk for 3-4 hours till the milk solidifies and becomes thick.

Whip together yogurt and baking soda.
To the khova add the flour and yogurt mixture and knead till it forms a pliant dough. (make sure not to add too much flour, just enough flour to make the khova pliant)

Make 3/4 inch diameter balls and set aside

Prepare sugar syrup
In a pan add the sugar and just enough water to cover the sugar. Heat till it comes to a boil.Squeeze the half of the lemon (this is to avoid sugar crystals). Set aside.

Heat the ghee and deep fry the balls, adding a few at a time till golden brown.Cool the balls and soak them in the sugar syrup.Let sit for a few hours.
Made Some Kaju Stuffed Jamuns too, that one is special for my Darling Son Narasimhan


Thursday, October 29, 2009

Peach Cake

It's weekend again! I always like to have a relaxing weekend without working too much in the kitchen but still able to enjoy some nice foods. I'll normally make some sweet stuffs to chill in the fridge and serve it at any time during the weekend.
Here, I've prepared some peach cakes which is a recipe from HHB. It's really a great recipe and very refreshing desserts. I made it into individual portion which I think is much easier for me to serve but definately much more works in advance. I followed the mousse recipe from HHB except the sponge cake. The texture is very good indeed!

Wednesday, October 28, 2009

Efficient Home Heating Means BIG Savings!

Now that October's here, you've probably started using your furnace at least for a few hours each day. Pretty soon, though, you know you're going to be running it much longer, maybe even all day. And if you're not careful, your heating bills can go through the roof.

Nearly half of all the energy used in American homes goes to powering heating and cooling systems; the annual cost of maintaining these systems is more than just about any other home utility. Residential HVAC units also emit millions of tons pollutants into the air, including carbon dioxide, sulfur dioxide and nitrogen oxides. With so much at stake, both economically and environmentally, it makes sense to reconsider your home’s HVAC efficiency as the cold weather approaches.

Putting just a handful of these tips to work can save you hundreds in utility costs each year and will help reduce your carbon footprint.

  • Clean or replace furnace and air filters regularly. Most filter manufacturers print a replacement schedule right on the packaging. It’s also a good idea to invest in a professional cleaning and tune-up once a year just to make sure everything is functioning as it should.


  • Keep air registers, baseboard heaters, radiators and vents clean. Check for excessive dust or debris, and make sure heat outlets and returns aren’t blocked by carpeting, furniture or draperies.


  • Use ventilation fans in kitchens and bathrooms only when absolutely necessary and just long enough to clear the air. It may seem like a small thing, but in just 60 minutes these fans can draw out an entire houseful of warmed air—along with your money.


  • Close doors and turn the heat down—never off—in unoccupied rooms. This will lessen the load on the rest of the system significantly and can make a noticeable difference on your heating bill.


  • Set your thermostat two or three degrees lower than normal. It may take some getting used to at first, but you can keep warm in the cozy new sweater you’ll be able to buy with the money you’ll save.


  • Invest in a programmable thermostat and customize a heating schedule for your home. Set the thermostat lower when you know you’ll be out of the house for long periods of time, and then program it to kick on just before you return. The hour or two of chill you’ll have to put up with when you get home will be a minor nuisance when you see the eight hours’ worth of savings on your utility bill.


  • Seal gaps under doors and in ductwork. Check ducts in attics, crawlspaces, unheated basements and garages for leaks or tears. Repair them using sealant or foil tape, then insulate. Use door stops to plug gaps under doors where drafts can sneak in. These simple steps can improve your heating system efficiency by more than 20%.


  • Run heat-producing appliances during the warmest time of day. Dishwashers, dryers and ovens all give off heat. Using these devices at the right time can actually help heat your home and take the load off your heating system, saving you money.


  • Consider purchasing an EnergyStar rated space heater. These units are great for supplementing the heat in a small area of your home, or to help keep infants, small children and the elderly comfortable without having to overheat your entire house.


Visit Horizon's Tips and Articles Library for More Useful Energy Efficiency Info!

Krishna-My first art work


Dear friends,

I am back from vacation! I had a great time with my folks in India! Had lots of sweets, visited temples, spent time with my family and did some shopping :). Overall the trip was relaxing and satisfying.

I have always admired my Grandpa's artistic works. While I was in India, I used that opportunity to learn how to decorate deities from him. I bought a black and white poster of Lord Krishna and tried my hand at adorning him with beads, velvet, pearl, stones and silk. The more I worked on this, the more involved and interested I became. Ain't he cute? :-)

OK. It's been a while since I blogged. I am still in the vacation mood. I promise I will get back to blogging and come up with nice recipes next week.

Hope you all had a blast on Diwali!!

Soya chunks churma & Awards

IMG_0122 copy

Soya chunks Curry:

Soya chunks are rich in protein & low fat food.It's vegetarian meat.It blends in easily in all types of dishes & absorbs their flavour.It can be used as a substitute for paneer,Vegetables and Meat.
After Panner & baby corn i love this.It's helps in physical growth for children.Regular intake keeps you energetic & active.It provides essential Amino acids and light & easy to digest.
Here recipe

Ingredients:

Soya-20 nos
Onion-1
Tomato-1
Grated coconut-1/2 cup
Fried gram dal-4 tsp
Fennel seeds/sombu- 1 tsp
Red chilli-4
Green chilli-2
Gasgasa- 1 tsp
Ginger garlic paste- 1 tsp
Turmeric powder-1/4 tsp
Salt -To taste
Curry leaves
Coriander

Preparation method:

1. Add salt in hot water pour into soya chunks, wait for 15 min.
2. Squeeze them & add cold water,squeeze it again.
3. Grind Red chilli,Coconut,gasgasa,fennel seeds,fried gram into smooth paste.
4. Heat the pan,add onion,green chilli,curry leaves & ginger garlic paste.
5. Fry until the onion cooks,add turmeric & salt,saute well.
6. Add tomatoes, saute until it will become soft.
7. Now add grounded paste,fry for 2 min.
8. Add soya chunks,mix well.
9. Add required water,allow it to cook for another 10 min.
10. Serve hot with Poori or Roti.

IMG_0126 copy

Awards:

Babli From KHANA MASALA shared these lovely awards with me.


award from Sreelekha Sumesh

award from sreelekha sumesh....

LemonadeAward from sreelekha sumesh


I_love_reading_your_blog


Sangeetha Subhash from Kothiyavunu shared this Kreativ blogger Award with me.


Thanks a lot for sharing these lovely Awards with me.Thanks for your encouragement .It's Motivate me to do it well.Thanks so much Sangeetha & Babli.

Monday, October 26, 2009

Wholemeal Okonomiyaki


This is not the best okonomiyaki but definately something healthier as I followed this guy using wholemeal flour for the recipe. It's quite flavourful with all the vegatables added. Perhaps using plain flour would be nicer. Anyway, I've gained some extra fiber this time :P

Sunday, October 25, 2009

Parikkai (Bittergourd) Pitla


Past one week, we have had fare amount of sweets and savories in the name of Diwali and proportionately the calories have increased. The routine cooking had taken a backseat in the name of Diwali preparations. Sambhar is one of the staple of palakkad iyers cooking. And slight changes in the spices roasted and vegetables used will result in another dish. One such is Parikkai Pitla. Piltai is not much favored because of the bitter gourd in it, especially kids. I know many homes that make it only for the annual ritual for the departed soul is performed (Shraddam/Devasom). The preparation is almost similar to Sambhar.My MIL adds kabuli chana in place of tuvar dal in the recipe. I have seen when chana is added, kids takes an instant liking to the dish though will not touch the bitter gourd pieces in it. I usually cook with a light green variety of the BG which we get in my place. This is less bitter than the dark green variety. Infact, you can't taste the bitterness in the dish at all. When made as a stir fry with the addition of onions and tomato, you can easily pass it on as any other vegetable with the absence of the distinct bitter taste.


Bitter gourd - 1 medium sized

Tamarind - lemon sized

Kabuli Chana / Tuvar dal - 1/2 cup

Turmeric

Salt


To roast and grind


Urad dal - 1 tspn
Chana dal- 1tspn
Red chilli- 3 nos
Pepper corn - 4 nos
Hing - few shakes

Grated coconut - 1/2 cup


Seasoning

Oil - 1 tblspn

Mustard seeds - 1 tspn

Curry leaves - few

Grated coconut - 1 tblspn


Pressure cook kabuli chana /tuvar dal till it is soft. If using kabuli chana, it has to be soaked for 5 hours. I soak them overnight.


Wash the bitter gourd. Slit it open and discard the seeds. Chop into bite sized pieces. Extract the tamarind juice. Take tamarind extract, salt and turmeric. in a cooking bowl. Add 1/2 cup of water. When the tamarind extract starts to boil, add the chopped bitter gourd pieces. When the vegetable is cooked tender, add the mashed dal/chana. Reserve the cooked dal water.


Roast the spices except coconut in a little oil, till they are light brown. Grind the spices along with grated coconut to a smooth paste. Add water while grinding. Dilute the ground paste with the reserved water and stir into the cooking pot. Adjust the salt and consistency of the gravy by adding water. Bring to a boil and let it simmer for few minutes.

Season with mustard seeds, curry leaves and a tablespoon of coconut. The coconut should be roasted till brown.


When preparing for Shradham, moong dal is used and red chilly is fully replaced with pepper corns.


Saturday, October 24, 2009

SnapIt - A plugin product review

SnapIt is a customized version of the standard print screen function. It’s a small plug in that can be downloaded in less than a minute even on a slow connection.  SnapIt makes the screen capture job lot easier and organized too. Once the program is started, a camera icon sits pretty on the status bar. To capture screen shots, you can continue using the print scr key. Once pressed, the mouse pointer changes to a plus sign and you can mark the area on the screen to be copied. Click on the icon to save the marked image to the desired location.


The image capturing be configured to different key options, other than the Prnt Scr key,  given by the program. Also the saving can be automated by defining the storage location, image formats (jpeg,png,gif,tiff & bmp) and starting name for the files and if it is to be incremental or random. Once these parameters are set, then capturing screen shots is super easy. All you do is just press the assigned key and go about with your work. The screen shots will be automatically saved in the designated folder.  This saves the time of opening software to paste the selected image, save and later crop to get the desired results. This plugin will be particularly useful for those creating tutorials or presentations.


(The above two images are captured with SnapIt)


A fully functional, trial version is available for 14 days. Thanks Katherine Poll for giving me the opportunity.


Friday, October 23, 2009

A Call for Stories and a Contest

The Kitchen Sisters are looking for stories and images and videos and writings.

We're launching a new multimedia series on NPR this January, a listener collaboration in the tradition of Hidden Kitchens, Lost & Found Sound, and The Sonic Memorial Project. This one's about girls. Girls and the women they become. Stories of coming of age, rituals and rites of passage, secret identities. Of women who crossed a line, broke a trail, changed the tide.

Small everyday stories, dramatic life and death stories. Stories from the middle of the city, to the middle of nowhere.

What women should we know about? What girl's story should we tell? The famous, the infamous, the unknown, the untold. Women with public lives. Women with secret lives.

Call our NPR Storyline at 202-408-9576 and tell us your story, or the story of someone we need to chronicle. Or email us at kitchen [at] kitchensisters.org

And here's The Contest. We want you to help us name this new NPR series. We've called it The Secret Life of Girls Around the World, The Scheherazade Project, 1001 Stories, all names we like but can't go with for one reason or another. So, we turn to you to join our brainstorming sessions. You can call or email us with your suggestions. Whoever picks the title will be featured on our website, get the full line of Kitchen Sisters products and productions, a wild boar dinner with forager, Angelo Garro, and the deep satisfaction of hearing the title you came up with on NPR throughout the year.

This soon-to-be-titled project will be full of richly layered sound and striking images, created by people around the world who help capture these stories of eccentric, trailblazing women and ground-breaking girls.

Join The Kitchen Sisterhood and help launch this new multimedia collaboration.

Thursday, October 22, 2009

Stuffed Surul Badhusha

Happy Diwali. Diwali Went Very Well. Lots of Sweets, Lots of Wishes, it was great. Terribly Missed Chennai  :( for the Dhoom Dhaam Damal of the Crackers. Made some Stuffed Badhshas, thought of sharing with you all.

Here goes the recipe..

Ingredients
All Purpose Flour - 2 cups
Ghee - 3/4 cup
Baking powder - 1/2 tsp
Sugar - 3-1/2cup
Oil for frying

Stuffing
Cashew-Badam Powder

Method
Mix flour, ghee & baking powder to get a soft dough. Divide into small balls. Roll them into small chapathi, take one/two tspoons of stuffing and spread it on the chapathi, roll it tight.


 Jus press a little to seal the ends. Wring it a little and bring both the corners together and seal them by pressing together. Deep Fry in oil.
For the sugar syrup, boil sugar and water to 1 thread consistency.
Soak the badhushas in the syrup for 10-15 minutes. Serve.


Wednesday, October 21, 2009

Durian Cheesecake

Mum bought me a cheesecake recipe book 我和起士蛋糕的秘密. (I think she has been addicted on buying me recipe books recently.) I miss her cooking and till now I can't forget those delicious foods she cooked and baked. But, she said she had retired from the kitchen :( Anyway, I think I've inspired by her passion in the kitchen when I was young. She cooks three proper meals plus an afternoon tea to serve the whole family including my grandparent and aunties uncles. I like to touch the ingredients while she was preparing foods but I always got warning not to touch this and that. If you're a mother you'll understand why she warn me. But, that wasn't stop me from loving the kitchen stuffs :) Oppss... back to the cheesecake recipe book. To appreciate mum, I think I better try out one of the recipe from the book. Since I've still got some leftover durian in the freezer, I decided to try out durian cheesecake recipe.

I didn't put so much hope on this recipe at first, because this is my first attempt and the recipe is not that very precise. I used a slightly bigger cake pan to make this also modify the amount of ingredients used from the recipe.

Guess what! The result is absolutely fantastic! If you're a durian lover and cheesecake lover, you'll hardly to resist this. The cheesecake turn out moist, rich and smooth. You will like it to melt in my your mouth slowly and feel hard to let go!
The recipe didn't mention about steam bake but I did it as I think steam bake would produce moisture cheesecake, that's what I found from my previous attempts on other cheesecake experiments. There is just one thing I didn't do it properly for drawing the net pattern on the cheesecake, it wasn't as nice as the recipe shown from the book (need more practice!) However, I must say the texture is a winner! Really yummy! Thanks mum for the recipe book!


Recipe for 7 inches (I used 8 inches lose bottom pan)

For the base (I used my own recipe for the base):
160g crushed chocolate marie biscuits (200g digestive biscuits)
80g melted butter (100g butter, melted)

For the filling (Slightly change the amount of ingredients from the book)
450g cream cheese (500g cream cheese)
80g caster sugar
170g durian flesh (220g durian flesh)
3 eggs (medium size, total about 160g)
80ml milk (90ml milk)
1 tbsp cornstarch (1 tbsp + 1/4 tsp cornstarch)

Toppings:
1 tsp cocoa powder + 2tsp water
Some Oreo cookie crumbs


Method:

  1. To make the base, stir all ingredients until combined. Press mixture into base. Set aside.
  2. To make the filling, beat cream cheese, sugar and durian flesh until smooth. Beat in eggs, one at a time, beating well after each addition.
  3. Beat in milk and cornstarch until blended. Reserve 1 tbsp cheese mixture for topping, the rest mixture pour into tin.
  4. To make the topping, mix well cocoa powder with water. Add in 1 tbsp of reserved cheese mixture, stir until well blended. Pipe on top of the surface of cheese mixture and draw net pattern with skewer.
  5. Steam baked at 170C for 45 minutes (my oven 150C for 50 minutes) or until light brown.
  6. Remove from the heat and leave to cool completely. Chill in fridge 5 hours or overnight.
    Decorate sides of cake with crushed Oreo cookie crumbs.

When to Replace an Aging Furnace?

This is the question we at Horizon Services hear more than any other around this time of year. As the temperatures begin to get cooler, you know you need to be prepared with a furnace that will get you through the winter ahead. Should you invest in a new furnace...or do you still have a few more years left in that existing furnace? Here are some important factors to consider:


Most HVAC experts will tell you that a good quality heating system should last at least 10-15 years. With proper maintenance, many systems will continue to work for 20 years or more, but energy efficiency becomes an important factor with units that old. If your furnace is more than 15 years old, you could be throwing money away on high utility costs.If you have an older furnace you should have it inspected by a licensed HVAC professional who can determine if there are any urgent issues that could lead to a system malfunction. Beyond that, think about the following if your furnace falls into the 15-25 year old range.


Could you increase your home’s fuel efficiency—and save money—by replacing the unit? The annual fuel utilization efficiency (AFUE) is a measurement of how energy efficient appliances are over the course of a typical year of use. A higher AFUE percentage means a product is more fuel efficient and cheaper to operate over time. AFUE was first used in 1992, but you can still get a general sense of your furnace’s AFUE percentage if it is older than that. Low-efficiency furnaces have an AFUE between 68-72%. They use natural drafts to move combustion gases, have a continuously lit pilot and a heavy heat exchanger. Mid-efficiency furnaces have an AFUE of 80-83%. They use exhaust fans to control gas flow, have electronic ignition instead of a pilot light and are lighter and more compact. High efficiency units register an AFUE of 90-97% and use condensation to move heat more economically.


Could retrofitting your older furnace take care of major issues? Many systems can be upgraded with things like programmable thermostats, new ductwork or temperature zone controls. These improvements will spare you the expense of replacing the unit while increasing efficiency and lowering your utility bill.


Was your furnace converted from coal-burning to oil or gas? Ancient coal-burning furnaces that were switched to gas or oil burners are prime candidates for replacement as they are notoriously inefficient, and the cost of a new system will pay for itself in a relatively short period of time thanks to the increased fuel efficiency and lower operating expense. If you have a gas furnace with a pilot light—not an electric ignition—you could also save significantly by replacing the unit.


Is your unit an oil-burning furnace that is more than 22 years old? While most oil furnaces can be perfectly reliable and surprisingly efficient for many years, once these systems hit the 20 year mark their efficiency and dependability begin to decline. If total replacement is not in the cards, consider upgrading your unit with a newer standard efficiency flame retention head burner. This is a special fixture that mixes a fuel oil spray with the air needed to cause combustion and can increase your furnace’s AFUE to around 80%. The flame retention head provides a more controlled fuel/air mix and makes the burning process much more efficient.


If you're on the fence about replacing your furnace, Horizon Services recommends that you do at least one of the following:


  • Schedule a Precision Tune-Up for Your Existing Furnace: A Horizon heating technician can perform this 21-point check in less than an hour. It's your best guarantee that your existing furnace will start the winter season in the best condition possible and get you through the cold months ahead. While performing your Precision Tune-Up, your Horizon heating technician can check to see if there are any broken or damaged parts and give you an accurate assessment of how much useful life your furnace still has.

  • Schedule an In-Home Energy Analysis: Horizon Services can do this for you for FREE. One of our Comfort Consultants can come to your home to examine your existing furnace, measure your home and understand your family's heating needs and budget. Your Horizon Comfort Consultant will give you an honest appraisal of your existing heating system and show you multiple options for heating your home more efficiently and affordably.

Tomato Thokku & Awards

Tomato thokku is a very common gravy made out of Tomatoes and Onion.It is a delicious side dish.When tomatoes are abundant and cheap in the market,this is the First thing that comes into mind.It is an all purpose curry.It goes well with Roti,Idly,Dosa, Rice and Bread.Tangy,spicy tomato thokku is something that I love,after marriage i found that its my Husband's favorite too.. so Every week i prepare this one.

IMG_0165 copy

Ingredients:

Onion-4
Tomato-5
Chilli powder-1 tsp
Turmeric Powder-1/4 tsp
Salt-To taste
Mustard-1/2 tsp
Curry leaves-1 arc
Coriander leaves-little

Preparation method:

1. Heat the pan with 1/2 cup of oil.
2. Add Mustard & curry leaves,once it pop up add chopped onions.
3. Saute well,once it will become golden brown add turmeric,chilli powder and salt.
4. Saute well till the raw smell goes.
5. Now add chopped tomatoes,fry well until it will become soft.
6. Cover with lid cook till oil comes from curry.
7. Serve hot with Idly,Dosa,Rice or Roti.

P.S:
You can store this for a week in Refrigerator.

IMG_0160 copy


Awards:

Babli & Raje have Showered me With this Awards.I have to thank them for their encouragement by passing these Awards.Thanks for Thinking about me & Sharing the beautiful Awards with me.I am so Happy to Receive this award from you.

I am Happy to receive Giant bear hug from Babli.

award-bear-thumb


award2


award1


Raje sent this Beautiful Presentation Award.Thank you Raje

yumpp

Tuesday, October 20, 2009

Vanilla Maida Cake, Ukkarai & Kaja ~ Diwali Sweets

Vanilla Maida Cake


This is Lalitha Maam's masterpiece recipe. Aunt makes it with different flavors and changes the color accordingly. I have always made with vanilla essence and used green color. This time my husband suggested to change the color. When I checked for yellow color, very little was left. I add a pinch of green to that yellow color and got a greenish yellow color. This is very easy to make provided you get the sugar syrup consistency correct, which is important for all Indian sweets.


Time : 20 minutes
Yields - 50 pieces

Maida/All purpose flour - 2 cups

Sugar - 4 cups

Ghee - 1 1/2 cup

Vanilla essence - 1 tspn

Food color - a pinch

Water - 1 cup


Heat ghee in a kadai. When it is hot, stir in the maida and switch off the stove. The maida gets cooked in the warm ghee. In another kadai, prepare the sugar syrup with 4 cups of sugar and 1 cup of water. When the syrup starts bubbling, add a tablespoon of milk. Let it continue to simmer. The scum will float on top and gently remove with a spoon. The sugar syrup should be of two string consistency, which is very important for this recipe. To check the consistency, wet your fingers and then take a drop of the syrup on your index finger. If stretched between your index and thumb fingers, you should be able to see two threads. If the syrup cooks beyond two thread is al so fine but not less, since much cooking is not done post that stage. Add vanilla essence and food color to the syrup. Stir in the maida+ghee mixture. And cook for two minutes till it comes together as one whole lump. Once maida is added to the syrup, you should act quickly. Once the sugar syrup has reached consistency, swtich off the stove. Mix in the mixture and give vigourus stir so that it blends in. Then heat the stove again.


Grease a plate with sufficient ghee and also a flat based cup (I use dhabhara) to level the mix once it is transferred to the plate. Since the cake has a soft texture, it doesn't set quickly. So you have time to level it perfectly. But you need to transfer the mix to the plate immediately from the kadai else the last portion left in the kadai tend to set faster leaving some granule texture to that part of the cake.
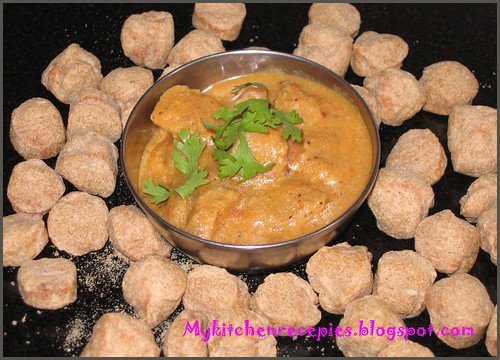


Ukkarai

This is a tradional sweet, made for Diwali in most of the Kerala Iyer homes, though i don't make it for every Diwali. This time around, I wanted to make it for memory sake.

1/2 cup tuvar dal

1/2 C chana dal or use 1 cup of chana dal alone

1 cup jaggery

3 tblspn ghee

Elaichi powder

Roasted cashew - few

Grated coconut - 3 tblspn


Roast both the dals till light brown. Pressure cook till it is soft and not mushy. Drain the excess water. Pulse the cooked dal along with coconut to a smooth paste.

Heat jaggery in 1/4 cup of water. Make syrup till it reaches the soft ball consistency. A drop of the syrup dropped in a tablespoon of water,should be able to roll into a soft ball. Stir in the ground dal + coconut paste. Keep stirring till the jaggery syrup is full absorbed by the dal and it turns dry. Add ghee at intervals. Mix in roasted cashew and cardamom powder. The texture is soft but not sticky.


Kaja ~ Andhra Special

I had the recipe noted in my diary, long back, taken from a Tamil magazine. In the magazine, the recipe was named as Curly Biscuits. The recipe was new to me and seeing the name I thought it as an innovative recipe. I had tried it then.  Later, blogging introduced me various regional specialities and I found the sweet is Kaja, a speciality of Andhra. I understand there are varieties of Kaja, marked by regional variations. I found a similar recipe at Srivalli's. Valli has neatly explained with step-by-step pics.


Preparing dough - 15 minutes
Resting time - 1 hour
Making kajas, deep frying, and clicking photos - 1 hour

Ingredients

Maida/All purpose flour - 2 cups

Salt - a pinch

Baking soda - 1 big pinch

Ghee - 2 tspn + 2 tblspn

Rice flour - 3 tblspn

Water - 3/4 cup


Oil to deep fry


Syrup

Sugar -1 cup heaped

Water - 3/4 cup


Mix maida, salt, baking soda and ghee. Add water to make a pliable dough. Leave the dough for an hour.  Resting time for the dough is essential to get good results. In a bowl mix together rice flour and ghee.It should be of spreadable consistency.


Pinch of a ping pong sized dough. Roll into a chappathi. Spread the rice flour + ghee paste on it.


Place another chapathi on it. Fold it from one end.


Lightly press the edges so that it sticks and doesn't open up. Cut intp 1 inch long pieces.


Slightly press them down to flatten the pieces.


Deep fry the pieces in moderate heat. Don't heat the oil to smoking point and fry in high flame. The inside layers will not get cooked.

Mean while prepare sugar syrup for one string consistency. Dip the fried kajas in the sugar pieces. Leave it for 2 minutes. Then remove them and spread it on a plate to cool.