Wednesday, December 31, 2008

Vanilla Chocolate Cake -Two In One

Last night, my friend T, who is in US now, called me to wish for the New Year. Every time she calls, we relive our childhood memories. Having lived in the same neighborhood and studied in the same school and college, we could talk about the good olden days for hours together. Even if we speak after a long gap of time, if we speak, its like starting from where we left last. T was more happy to tell me that her friend referred her my blog, without knowing about our friendship. She was thrilled to hear the praises heaped on me by her friend. T wanted to share that joy with me. Needless to say, she made my day. That's a big boost for me as a blogger. And also the fact that my blog helps many silent readers is indeed a thing of joy. Now coming to the post, during our telecon, T wanted me to share a cake recipe. So that comes as the last post of the year. This post is dedicated to our friendship and the virtual cake is for T and her family for the New Year.


Kajal's Chocomilk cake is in my to-be-tried list, ever since I saw it on her blog. I followed Kajal's recipe with slight modifications.

Ingredients
All purpose flour/Maida - 1 cup

Powdered sugar - 1 cup

Milk - 1 cup

Ghee - 3/4 cup

Baking powder - 1 tblspn

Cocoa powder - 1 tblspn

Vanilla essence - 1 tspn

Next time, I might try substituting 1/2 cup oil + 1/4 ghee.

Method

Beat powdered sugar and ghee for 10 minutes. Stir in milk and maida alternatively with out forming lumps.Add vanilla essence. Beat the mixture with a beater or hand till it is blended well. Transfer 3/4th of the batter to the greased cake tin. In the remaining batter stir in cocoa powder and mix till it is uniform. Bake it in a preheated oven at 180 C for 40 minutes.

My idea was to pour like how Kajal has done . That is forming the cocoa layer sandwiched between the plain ones. The shape of my cake tine and quantity of cocoa batter did not come along with my idea. Finally decided to make like a layered one. Go over to Kajal's to see the lovely step-by-step presentation.

I baked this cake to send as a gift for my friend. So I did not get to taste the cake. But from the tiny crumbs I got to taste, I felt it has come out well. I am yet to receive feedback from friend.


Here is Wishing all my friends a fabulous 2009 filled with more of happiness and less of worries.


Monday, December 29, 2008

Orangi Toli Gojju - Tangy Tamarind Gravy with Orange Peels

ORANGI TOLI GOJJU - a tangy tamarind gravy with orange peels

This dish is prepared using orange peels, tamarind and other spices, and seems to be simply bursting with flavours. As children we watched adults who were about to eat an orange, and waited impatiently to grab the peels before they got discarded. We just loved to collect the peels for mother, who prepared a lip smacking gojju out of it. The peels of the oranges known as ‘loose jacket’ or ‘Kamala orange’ are the best for preparing this gojju. Though the peels can be sun dried and stored for future use, I feel that waiting for the season and using them fresh captures the unique flavour.


Ingredients:
Peels of one orange chopped – ½ cup
Tamarind – 1 golf ball sized roll
Salt – 1 and 1/2 tsp
Sambar powder – 1and 1/2 tsps
Turmeric powder- 1 pinch
Jaggery – 2 tbsps
Green chillies( slit) – 2
Red chillies ( broken) – 3
Fresh ginger slivers – 1 tsp
Asafoetida – 1 pinch
Mustard seeds – ¼ tsp
Fenugreek seeds – ½ tsp
Bengal gram dal – 1 tbsp
Curry leaves – a few
Gingili / Sesame seeds (roasted and powdered) – 2 tbsp
Gingili / Til oil – 3 tbsps
Rice flour ( for thickening) – 1tsp

Method:
1. Soak tamarind for 10 minutes, and then extract the juice and keep aside.
2. Heat oil in a pan and add mustard seeds.
3. When it splutters add fenugreek seeds and fry.
4. Add Bengal gram dal and roast till golden in colour.
5. Add asafoetida and red chillies.
6. Add green chillies and the fresh ginger slivers.
7. Now add the chopped orange peels and the curry leaves and sauté, then cover with a lid and cook in low flame.
8. After 2 minutes remove the lid and add turmeric powder and fry for a few seconds.
9. Add tamarind juice, salt, jaggery and sambar powder and boil the gojju until it emanates an aromatic flavour.
10. If you need it to be thicker add a paste of rice flour and water and simmer for a few minutes.
11. Finally add the roasted and powdered gingili (sesame) seeds and blend well.


Relish this tongue tingling tangy aromatic gojju with rice, rotis or any other tiffin.

Panettone

I made this Italian bread for Christmas breakfast to cheer up the Christmas atmosphere.
Recipe:
(A) 80g raisin / 80g apricot / 150g rum
(B) 200g bread flour / 30g honey / 3g yeast / 90g water / 20g apple puree
(C) 100g bread flour /20g sugar /1/2 tsp salt / 1 tsp rum / 30g eggs / 20g milk
(D) 80g unsalted butter
(E) 30g sugar powder / 50g plain flour / 5g milk powder / 40g unsalted butter
Methods:
  1. Soak the ingredients (A) with rum for 5 hours or overnight. (If you don't fancy about liquor, replace it with orange juice)
  2. Mix ingredients (B) at low speed using a dough hook mixer till everything just combine. Place the dough in a clean bow with cling wrap to sit for 3 hours.
  3. Mix ingredients (C) with (B) and knead at low speed then turn to medium speed until it become a smooth dough.
  4. Add in the butter and knead at low speed until the butter combine with the dough. Turn to medium speed continue the kneading process until it become a smooth and elastic dough.
  5. Drain the ingredients (A) then add into (4) until the dough fill up with all the raisin and apricot.
  6. Place the dough into a lightly grease bowl and cover with cling wrap to proof for 60 minutes.
  7. While waiting for the dough, mix the ingredients (E) with finger tips until it become crumbly texture. Set aside and ready to use.
  8. Divide the dough into 3 portions and round them into balls. Place each dough into the Panettone cases and proof for 60 minutes.
  9. Egg wash the doughs and sprinkle over some crumble on the doughs. Bake at 180'C preheated oven for 25 minutes until golden brown.

Sunday, December 28, 2008

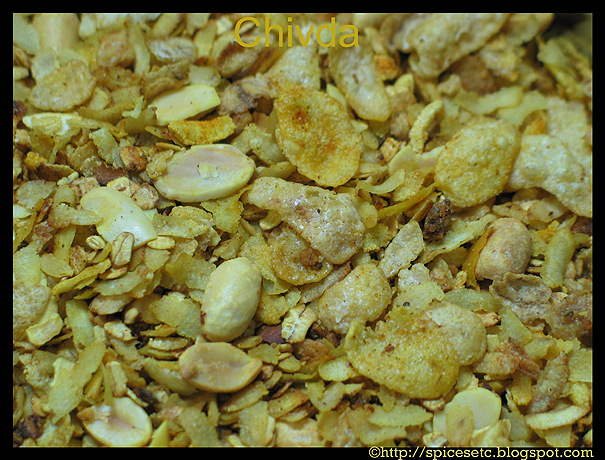
Chivda-Crispy Poha flavored with spices


Chivda is a Maharashtrian snack made of poha(aval) and spices. I added a few more ingredients to my liking. You can increase or decrease the quantity of each ingredient to suit your taste.

Ingredients:
Poha(thick or thin)-1 cup
Instant Oats(optional)-1/2 cup
Corn flakes-1 cup
Dried coconut flakes-1 tbsp
Oil-1 tbsp
Turmeric powder-1/2 tsp
Chilli powder-as per taste
Salt
Sugar- a pinch
Curry leaves- a few sprigs
Dry roasted slivered almonds(optional)-1 tbsp
Dry roasted peanuts-1 tbsp
Hing- a pinch

Method:
Heat oil in a pan. Add curry leaves, turmeric powder, chilli powder, hing. Immediately add poha. Roast on low flame for 5 minutes or until crisp. When it turns crispy(it will still be white in color during this stage), add corn flakes, oats, coconut flakes, salt, sugar, almonds and peanuts. Stir for 1 more minute and turn off the heat. Transfer the mixture to a container. Allow it to cool completely. Then store it in an air-tight container.

Note:Oats get roasted very quickly. So add it after roasting poha well.
Roasted oats give a nice aroma. So I like adding it to the mixture.

Sprouted Kollu (Horsegram) Pongal


After a break, I am back again to blogging. After the vacation, I had planned some posts but both office and home took away all the time and naturally blogging took a back seat.

I regularly sprout moong,horse gram and wheat. Mostly it is steamed and used in salads and stir fries like cabbage/carrot. Occasionally moong sprouts are used in gravies for rotis/rice. I was thinking of using moong sprouts for preparing pongal in place of moong dal. When I planned pongal, I had only horse gram sprouts. Decided to go ahead with my plan of making pongal with the available sprouts. Actually, I was very skeptical of how it will taste and that too I was preparing it for breakfast. If it doesn't turn out well, I won't have time to prepare anything else since my husband leaves at 7:00 in the morning.

But When I opened the pressure cooker, I was completely swept over by the aroma of horse gram and rice combined with hing and turmeric. And with seasoning added to it, it was a winner.

sprouted horse gram (kollu/muthira) - 1/3 cup
raw rice - 2/3 cup
turmeric - a big pinch
hing powder - few shakes
water - 3 cups

Seasoning
Ghee - 3 tblspn
crushed pepper - 1/2 tblspn
jeera/cumin - 1 tspn
small wedge of ginger finely chopped and lightly crushed.
salt
curry leaves

Pressure cook horse gram,rice,hing powder and turmeric in 3 cups of water. Horse gram will not cook mushy. It gives a nice crunch to the pongal. Mash the cooked mixture.

Heat a kadai. Add 3 tablespoons of ghee. Add rest of the seasoning ingredients. When jeera turns into light brown, add it to the cooked rice+gram mix. Mix well. Serve hot with coconut chutney or any tamarind based gravy.


The consistency of pongal remains the same even on cooling unlike moong dal based pongal.

This goes to JFI-Sprouts guest hosted at Ammalu's Kitchen.

Fruity Fruit Cake

Before the Christmas, I was requested by a friend to make a tray of fruit cake and wrap it as little small gifts. I really have no idea what fruit cake recipe to use as there are so many version of fruit cake recipe. Finally, I used a traditional fruit cake recipe from Nigella Lawson. I managed to buy some natural dried fruits from the market and I think natural sweet would be better than artificial sweetness. Furthermore, I reduced the sugar from the original recipe and the cake turn out just nice. The cake was really chewy with the natural sweetness and the cake crumbs wasn't too sweet and buttery. You could see from the picture the dried fruits are more than the cake crumbs which was the purpose of just to bring all the drieds fruits combine together. I baked a tray and finally I'd cut into even size of 49 pieces.

Friday, December 26, 2008

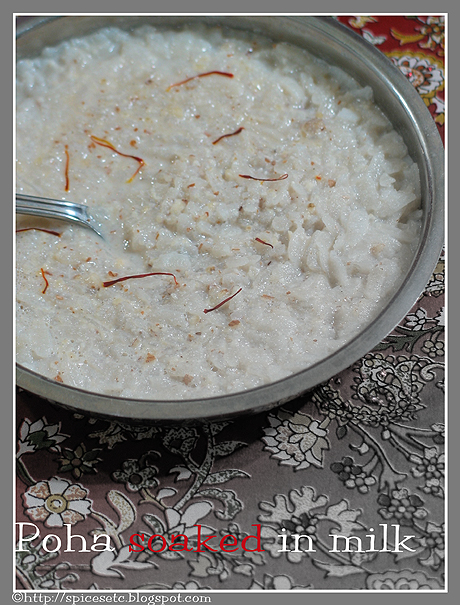
Poha(Aval) soaked in milk-in black & white?


Are you hungry and looking for a quick fix snack? Try this recipe. I have been eating this quite often ever since I saw the recipe in creative saga's blog! It hardly takes 5 minutes to prepare.
So here is the recipe..

Ingredients:
Poha-1 cup(thin variety)
Warm Milk-1/2 to 3/4 cup depending on the consistency
Almonds-5
Walnuts or Cashews-4
Sugar-2 tsp(or according to taste)
Cardamom-a pinch
Saffron(optional)-a few strands

Method:
Wash poha in water and drain. Set aside for 10 minutes.
Powder the nuts.
When poha becomes soft, add warm milk, sugar, cardamom, saffron and ground nuts. Mix well and serve.

Easy and healthy isn't it?

Log Cake

It's been very busy time for me in the pass few weeks. Perhaps now is the time to take a break and enjoy my baking diary. This is my first year of x'mas in this little land. I'm glad that my family could celebrate with me. We enjoyed the x'mas dinner and gifts exhanged. Although it's very tiring but absolutely worth it.

Here is my log cake for the x'mas. I used my previous roulade recipe to make this log cake simply place a few little snow man, x'mas trees and deers to make it looks a bit interesting. This log cake remind me a very old log tree I saw in the jungle during the winter years ago. It looks like a very damp, cold and old tree. I guess the Oreo crumbs make it looks so alike. But, I simply forgot to sprinkle some icing sugar so that it looks more alike :(
Well, I'm so glad they enjoyed the cakes and play around with those little snow man and deers. Very fun!

Wednesday, December 24, 2008

Care & Feeding of your Garbage Disposal

With the holiday times here, we are getting a lot more calls for clogged kitchen sinks. Most of these calls are due to a garbage disposal being used, or cared for, incorrectly. Let’s go over a few things about proper operation of your garbage disposal.

First, let’s just call it a disposal. Calling it a garbage disposal gives people the false impression that they can put anything in there, just like the trash can. This is not true. Here are the top 3 rules to using a disposal properly, and thereby helping to prevent the need to call a plumber (like AB&R Plumbing) to fix it.

1) Both the disposal and the water have to be running.
It doesn’t matter which one you turn on first, but the water needs to be running full blast and the disposal needs to be on. Some people claim that it matters whether you use all cold, all hot or a mixture; I have never found this to be true. What is true is, the more water the better.

2) Never put more in the disposal at one time than you would comfortably put in your mouth (if you ate this stuff).
And you wondered why I called this blog the care & “feeding” of your disposal! Seriously though, if you only put small portions into the disposal at a time, it will work much better, last longer and be much less likely to clog. It may take a little longer to finish your food preparations or cleanup, but it will take a lot longer if you have to wait for the plumber to come fix it!

3) Let the disposal finish one “bite” before feeding it another.
What I mean by this is, let the noise go back to the same sound you get when it is running empty. Let the water run for a little while longer and then “feed” it another bite. When you are finished, let the disposal run about 15 seconds longer than you think you have to and let the water run 10 seconds longer than that.

If you follow these 3 simple rules, you will eliminate most of the problems people have with their disposals. (By the way, 2 of the worst things you can put down a disposal are coffee grounds and potato peels. Neither one will hurt the disposal, but they both are the most frequent cause of clogs. Just though you might want to know!)

Let’s all work together to help make this holiday season, and the entire year, a joyous, happy time, free from the hassles of clogged disposals and interrupted plans.

Merry Christmas!

Tuesday, December 23, 2008

A Sonic Stocking Stuffer


As we begin gathering for our new NPR series about the secret life of girls around the world we thought we'd share a work in progress.
Pat Cadigan, a science fiction writer, heard about our project and sent us this short story memory inspired by the original 1951 version of The Day the Earth Stood Still.


Listen to Pat's story


As the tide turns on 2008, we
thank you for making a tax-deductible contribution to The Kitchen Sisters Productions. Your gifts and support have helped create our Peabody Award winning series. If you haven't had a chance to contribute this year you can do so now here.

Monday, December 22, 2008

Kitchen Countertop Trend Report

Industry publication Kitchen & Bath Design News recently published an extensive report to designers on trends in kitchen countertops.

The usual granite, stone and quartz products are still holding their own, but an interesting thing is happening with the current economic crisis: Laminate countertops are making a resurgence!

There is now an entire generation who have not lived with laminate countertops, except in economy apartment buildings and condos. And those are usually the postformed type with a curve up to a 4" high backsplash. Laminate countertops can be made to look very much like stone when they are made with square edges and installed with a tile backsplash.

There is even a system to undermount your sink in a laminate countertop!

Users have to take care not to damage laminate with a hot pot or a sharp knife but, as an interim countertop meant to be replaced with a lifetime one when funds become available, laminate is a good option to save thousands on your kitchen remodel.

The report also says that wood countertops are being used now more than in recent years. This is problematic because wood countertops are more expensive than laminate and do not hold up well at all around sinks or cooktops/ranges. I, personally, love a section of wood countertop between my cleanup and cooking areas for prep. It is great to have a dedicated area for cutting that doesn't require getting out a cutting board. Just keep it far enough away that the fire and water don't destroy it. And make it replaceable so you can chop away to your heart's content without worrying about how it will look after years of use.

Green countertops are also making news: Recycled glass and locally quarried stone are both green options, though they tend to be as pricey as less green products that are imported.

Be sure to test any product you consider using in your kitchen. Kitchen counters are subject to a lot of stresses and stains. The ones you select should be able to stand up to whatever you throw at them.

Peggy

Sunday, December 21, 2008

Low Fat Malai Kofta


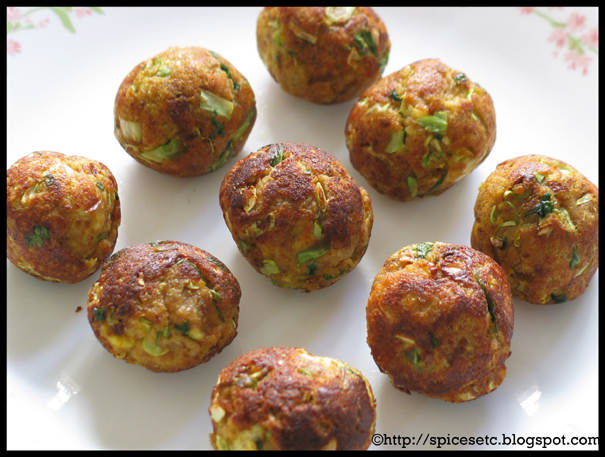
I have always been reluctant to make Malai kofta for two reasons. firstly, it is deep fried and very rich. Secondly, it is time consuming. When I came across Redchillies recipe, I was tempted to try it out because it doesn't involve any deep frying. Isn't it a brilliant idea to use Kuzhipaniyaram(Appe) Pan for cooking the koftas? I also checked out Laavanya's recipe and combined both their versions.

I did not add potatoes to my kofta. Instead I used bread. Of course there was some compromise in taste.

Ingredients:
For Koftas(Measurements can be changed according to your taste):
Bread slices-3 or potatoes(cooked, peeled and mashed)-2
Fresh grated paneer-1/2 cup
Very finely chopped cabbage-1/4 cup
Coriander leaves chopped-a handful
Grated carrot(optional)-2 tsp
Salt
Turmeric powder-a pinch
Red chilli powder-1/4 tsp
Coriander powder-1/2 tsp
Kitchen king masala or garam masala powder-1/2 tsp

For Gravy:
Oil-2 tbsp
Cloves-3
Cinnamon-2 inch stick
Cardamom-2
Star Anise-2(crushed)
Jeera-1 tsp
Ginger chopped-1 tsp
Garlic chopped-3 pods
Almonds(soaked in water for 15 minutes) or cashews-12
Onion chopped-1 medium sized
Tomatoes chopped-3
Salt
Turmeric powder-1/4 tsp
Red chilli powder- as per taste
Coriander powder-1 tsp
Kitchen king masala powder(optional)-1 tsp
Garam masala powder-1/2 tsp
Milk(I used 1% fat)-1 cup
Coriander leaves-to garnish


Method:
To make the koftas:
If you are using bread slices, drench each slice in water and gently squeeze excess water. Mix with rest of the ingredients and make small balls. If the mixture is too dry(when using bread), add 1 tsp of water and make balls. Heat kuzhipaniyaram(Appe) pan. Add 2-3 drops of oil in each hole. Place the balls and cook on both sides till golden brown. Set aside.

If you are using mashed potatoes, mix them with rest of ingredients listed above and roll the mixture in bread crumbs and then shallow fry in the appe pan.

To make the gravy:
Heat oil in a wide pan. Add jeera and let it crackle. Add cloves, cinnamon, star anise, cardamom and fry for a few seconds. Add chopped ginger, garlic and onions. Sprinkle little salt. Fry till the onions are cooked and turn brown. Add tomatoes, some more salt and all the spice powders. Fry for a few minutes until tomatoes turn soft. Allow the mixture to cool. Grind it with almonds to a smooth paste. Put the mixture on the stove again. Add milk and heat it for 5 minutes. Add kofta balls and simmer for 2 minutes. Garnish with coriander leaves and serve with rotis or nans.

Saturday, December 20, 2008

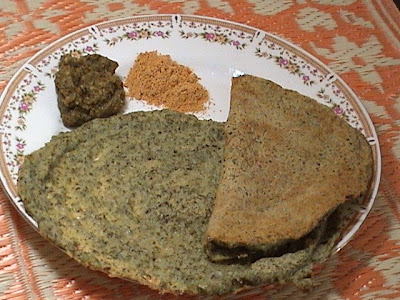
Green Gram Sprouts Pesarattu or Pancake

GREEN GRAM SPROUTS PESARATTU
Athithi Devo Bhava (Sanskrit) means a guest is considered an incarnation of God. Perhaps this is what drives the hospitality culture, a mark of an Indian home. Rising up to the occasion and managing an urgent need, is faced by every one in all walks of the day to day life. Indian homes, especially the kitchens, have proven this fact time and again by their hospitality in welcoming unexpected guests at any hour of the day, and serving warm, tasty, and filling meals.

Once an unexpected guest landed at home after a three hour journey, and was in a huge hurry to attend a meeting. It was an odd hour, and there wasn't any meal as such readily available. Since there was no time to soak or knead or cook or steam, I opted to prepare this pesarattu with some green gram sprouts I had in the fridge. I first greased the tava and put it on slow fire. By the time I ground the sprouts with spice and salt, the tava was hot enough to spread the batter. The hot and crisp pesarattu was served on the table by the time the athithi freshened up and got ready to go.

INGREDIENTS:
Sprouted green gram dal – 2 cups
Green chillies – 2
Fresh ginger – 1’’ piece
Asafoetida – 1 pinch
Finely chopped onion – 1
Finely chopped fresh coriander- 2 tbsps
Cumin seeds – 1 tsp
Salt – 1 tsp
Cooking oil – 2 tbsps

METHOD:
1. Grind the sprouts with green chillies, ginger and salt into a batter. It need not be too smooth, and a slight coarse texture adds to the taste.
2. Mix in the asafoetida powder, chopped onion and coriander, and cumin seeds.
3. Grease the tava (pan) and heat it.
4. Pour one ladleful of the batter and spread it into a fairly thick circle.
5. Dribble oil all round and cook in moderate heat until crisp.
6. When it is cooked turn it on to the other side and cook for one more minute.
Serve this with pickle, chutney, sambar, curd or even tomato sauce!

This post goes to two events JFI Sprouts at Ammalu's Kitchen and Recipes for the Rest of Us at Ramki's One Page Cook Books.

Friday, December 19, 2008

countertops; painting

Not much time to write, but here’s a quick update of some big changes. 

The countertops were installed (Dupont Zodiaq in Abyss Black) and we got the first coat of paint on the walls.  There is still much to do, but we’re getting there. 

What do you think of the paint colors?  I'm loving this green we chose for the living room.

Thursday, December 18, 2008

Eggless Oats & Dates Cookies-A light tea time snack


These are almost fat free, not so heavy healthy cookies perfect to munch with a cup of tea. I followed Mrs.Chithra's recipe without making any changes. I used only 1 tbsp of oil and 2 tbsp of milk to make the dough. For tastier cookies, you can add 1/4 cup of melted butter instead of oil and milk. I did not add any sugar because of health reasons. Instead I added more dates.

Ingredients:
Wheat flour-1/4 cup
Instant oats-3/4 cup
Dates(minced)-1/4 cup
Brown Sugar-1/4 cup
Oil-1 tbsp
Milk-2 tbsp
or substitute milk and oil with 1/4 cup melted butter

Method:
Preheat oven to 375 F
Mix all the ingredients and make a dough.
Make small balls and place them in a baking tray lined with aluminum foil(grease the foil with oil). Flatten the balls slightly(1/4 inch thick) with a spoon.
Bake for 20 minutes(turn over in between after 10 minutes). Let it cool and store in an air tight container.

Obviously the cookies will taste yummy if butter is used.

I am sending this recipe to the following events:
Sangeeth's Eat Healthy during Pregnancy
Purva's Christmas Festivities
JZ's Santa's holiday challenge
Sharmi’s Cookie Baking Event
Vandana’s Baking for Beginners

Wednesday, December 17, 2008

Baked Methi Muthiya(Savory Fenugreek Crackers)


Finally I got to bake something(after moving to this apartment) in the oven which does not have any feature except the knob to set the temperature :) It doesn't have these features-timer, light, preheating facility, display screen, clock, sound indicator, touch keypad and so on. It basically has nothing. I really wonder if it is an oven or some storage space. But I dared to bake something today. My husband is out of town and he has taken the car. It's raining cats and dogs! What else can you expect me to do at home? So I went ahead and baked Methi Muthiyas. I took the recipe from Ashwini's blog and modified it a little bit.

Ingredients:
Besan Flour(gram flour)-1/2 cup
Wheat flour-1/2 cup
Salt
Pepper
Red Chilli powder-1/4 tsp
Hing(Asafoetida)-a pinch(optional)
Kasuri Methi(dried Fenugreek leaves)-1/2 tsp
Oil-2 tbsp

Method:
Preheat oven to 350F.
Mix all the ingredients except oil with little water to form a dough. Add oil to the dough and knead well. Divide the dough into small balls and place them on a greased baking pan. Flatten them into thin disks(less than 1/4 inch). Bake for 10 minutes. Take the pan out and turn over the muthiyas. Bake until crisp and golden brown(10 minutes approximately).

Tuesday, December 16, 2008

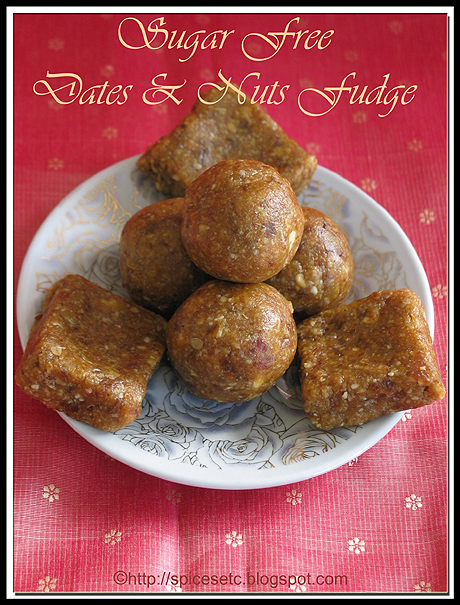
Dates and Nuts Fudge(cake)-Sugar free & Natural


Remember Divya's Nutty Energy Power Balls? It is packed with protein, iron and fiber. Thanks Divya for sharing this healthy recipe. I modified the recipe and prepared it today as it marks the beginning of Margazhi(Tamil month from Dec 16th-Jan 14). Rendering of Thiruppavai(holy rhymes) to Goddess Andal is the main significance of Margazhi. Thiruppavai consists of 30 verses and 1 verse is sung every day for 30 days. To understand the meaning of all the verses visit Wiki. I love listening to Thiruppavai early in the morning. If you would like to hear the same, click Hummaa. Pongal is prepared everyday and offered to Goddess Andal during this month.
Also, it is Christmas time. One more occasion to indulge in a dessert!

Ingredients:
Raw Mixed nuts(cashews, walnuts, almonds)-3/4 cup
Instant oats(dry roasted for a minute and ground to a fine powder)-3/4 cup
Dates-roughly 12(adjust according to your taste)
Ghee-1 tbsp
Cardamom-a pinch

Method:
Powder the nuts and oats separately. Grind the dates to a smooth paste.
Mix all the ingredients together to form a dough(like chapathi dough). Add ghee little by little while kneading the dough.
Flatten the dough(see the picture below) and cut into pieces or roll them into balls.


I am sending this recipe to the following events:
Sangeeth's Eat Healthy during Pregnancy
Purva's Christmas Festivities
Happy Cook's Homemade Christmas Gifts
JZ's Santa's holiday challenge

Kitchen Treasure Hunt - Event Round Up Part 2

Kitchen Treasure Hunt - Event Round Up Part 2


… and now finally for the round up of posts from Bloggers! Many bloggers have shared multiple treasures in their posts. We have tried to provide a flavour of what you can see at each blog here, rather than list every item on every blog! We strongly recommend that you visit all the blogs so that you don’t miss any treasures! Feel free to mail us, if we missed a major treasure category and we will surely update this post!


The day doesn’t begin without a shot of caffeine! Let’s look at what gadgets some of our bloggers use for their beverages. Anu Venkat and VnV share how to make the perfect filter coffee! Jayasree, Cham and Priya Suresh treasure their filters too. Uma uses an Italian Coffee Maker for her cuppa. Ivy shares her Briki used to make Greek Coffee. Purnima uses a nifty battery operated blender to whisk up delicious hot and cold beverages. Happy Cook opened up her very unusual coffee filter for this event. She was thinking about throwing away this treasure! We hope all of us convinced her otherwise!

Jai and Bee share their beautiful collection of coffee pots and creamers. Tetsubin tea pots from Japan, sake cups, a unique teapot made by their friend at a pottery class, and many more. Divya. M displays her very colourful set of designer teacups. You can find Shama shares tea cups, juice cups and soup bowls here.

Aparna shares several of her traditional treasures, all well preserved such as the brass dough press, urali ,kal chatti and mathu! Check out her appakaaral, where you can still see her grandfather’s initials inscribed! PJ has a lovely post and brings her kuzhi paniyaram pan made of soap stone, kal chetti, eeya chombu, mathu, and the traditional old brown and white porcelain pickle jars. She also shows us how to use a Kumutti or traditional stove. Thanks to her father for clicking all these treasures for the Hunt! You can see another Kumutti here, and porcelain pickle jars here. Jayasree shares her idiappam press, iyya chombu and uruli as well. Shama shares her Paniyaram pan and a variety of other gadgets at her blog. Read Chitra Amma’s explanation on eeya chombus here!

Who says only appams and paniyarams can be made in appakaarals? Take a look at Mamatha’s Japanese Takoyaki Nabe, which are actually used for … I know this is a veggy site …octopus dumplings! Happy Cook on the other hand cooks snails in garlic butter in this French Escargot!

Now for moulds, presses and squeezies of all kinds. Pallavi brings treasures from Telangana. Gavala Peeta and Kariyali Peeta help provide designs of sweets and savories. She also shares her Boondhi Jalli Ganta and Murukku Press. Priya Suresh also shares her grandmother’s idiappam press. Chitra Amma has a different kind of idiappam press. Divya M shares her muruuku press. Happy Cook brings for us a traditional Kerala Achappam or Rose Cookie Mould! Cham shares two types of murukku press – both old and new, a boondi tray, and idli trays of different dimensions!

Lakshmi grumbles about the thickness of her cast iron rotti pan! Check the thickness here! She still manages to turn out a mind boggling array of rottis if you’ve been following her blog! You can see few more cast iron rotti pans from Srirangam here.

Don’t we all have our favourite spices. How wonderful to have all of them in one large box, with tiny spoons as well! Check out Rajeswari's Aindu Arai Peti. Shama has a set too.

Here is a menacing looking koduval! One powerful blow is enough to crack a coconut! Jayasree also shares her chirava to scrape coconut. Here is Uma’s favourite mandolin and Cham’s coconut scrappers. Shama shows us this very different type of coconut knife. Her Aruvamanai looks very comfortable too, with a small built in bowl to hold cut veggys or coconut.


Now for all kinds of pounding, dehusking and winnowing gadgets! Ivy’s Goudi and Goudoheri from Cyprus is made of bronze! Aparna’s from Kerala is made of brass. Priya Suresh’s is made of granite. Yosee shows us the Kobek and Ulek from Indonesia , as well as Ketugan which requires 4 to 5 people to pound and dehusk paddy! She also shares a tradional Indonesian winnow. Cham's Muram is made of cane and now decorates her wall, and Priya's muram is made of steel.

Our favourite Steamers have got to be the Cooker. Sangeeth shares her electric, as well as pressure cookers . ‘Ibu’ or ‘mother’ is the way Indonesian House Keepers are addressed, and Yosee says her Ibu would not manage without a this Dandang,! While many of us use the pressure cooker for rice idlis and rice. Divya M brings a steamer especially made for idlis, and a vessel she uses for boiling and draining rice - Vadicha Saadam Paanai. Here is Rajeswari's idli steamer. Navita shares a Dimsum Steamer plate she bought at Hong Kong.


You can find cake decoration equipments (and cakes!) as well as a doughnut maker, at Ramya's blog. Uma loves her steel, and her collection has traveled with her across three countries. Shama shares her collection of steel pots as well. Priya Suresh shares her husbands favourite beer mug, and a welcoming French Soupiere. She also shares a 'common-but-not-so-common-nowdays’ 3 rung steel Tiffin Carrier! Ivy shares a Tsestos from Cyprus, a colorful shallow cane basket to keep bread. Navita was in a dilemma on what to take and not, when she traveled to Hong Kong. She ensured she carried a Kolkata Sadsi, Chimti, Belan, Dal Ghotni , a Pressure Cooker, and not to forget her Chalni! She uses her Chalni for purposes other than sieving and you can read her post for details! A chalni is called a saladai in tamil. Take a look at Shama's saladai. Ramya has a whole lot of kitchen gadgets that her kitchen came equipped with, and we don’t know the uses for many! She had made a slide show of all of them. Drop by her blog, and let her if you know what is for what!


This brings us to an end of the round up, and many hours of interesting blog hopping! This event served another purpose for us as well! It opened our eyes to the world hunger problem. Ivy and two others bloggers have begun an online community of Food Bloggers, to spread awareness about hunger and make a difference by some positive action. When you visit her post for Treasure Hunt, you will find the community. While we have participated in school fund raisers and so at some point in time, it was for the first time that we actually did some reading up of facts on world hunger. We felt really bad that India contributes to 50 % of the problem! Well, irrespective statistics, hunger and starvation at any place is appalling. Do join the BloggerAid community and participate. Play the 'Free Rice' game (see left had column of this blog) as often as possible. Contribute food when scouts and guides come to your place for the cause. Next time you celebrate at home, just make some more food and take them to the needy in your neighbourhood. We Foodies love our food. We can appreciate what it is to be deprived of even one meal. We can collectively make a difference!

Monday, December 15, 2008

cabinets

Jon: Isn’t there a Christmas movie that ends with a young boy proclaiming from his window “Merry Christmas, and peace to all” – or something like that?  It’s a snowy street, people are walking, bells are ringing, doves are flying – you know what I’m talking about?  He’s happy.  Like, Red Rider B-B-Gun happy, but not The Christmas Story. 

Craig: I don’t know – why?

Jon: I just need to know.

Craig: Is this for the blog?

Okay.  Maybe so, but I couldn’t come up with a more apropos analogy to depict my love for the way things are turning out.  “Base cabinets are in, and peace to all” – hear it?

We got the base cabinets installed and the countertop contractor came out to take measurements.  It went well; he said we did a great job on getting everything level, etc.  The tentative installation date is next Friday!  We’re pretty excited – like, Red Rider B-B-Gun excited. 

The refrigerator was also delivered.  I can’t wait to fill it with leftovers… from all the cooking, of course.


Sunday, December 14, 2008

With a little help from our friends...


Dear Friends,

The other day we were forwarded this entry that Jake recently wrote on his blog:

“I have always given during food drives but it didn’t become my cause until October 8, 2004 when I heard The Kitchen Sisters’ story "An Unexpected Kitchen the George Foreman Grill" on NPR. I was crying by the end of this story. I have never looked at George Foreman, his grill — or hunger — the same way again.” — Jake

We don’t know Jake, but he was sharing his passion to end hunger with his online community. What had inspired him? A Kitchen Sisters story that aired on NPR four years ago and that continues to have a vast, grass roots, ever-expanding life online.

We are writing because we need your help to continue creating stories that reach out and inspire this kind of action and understanding.

As independent producers, not NPR staff, we support our work through grants and donations from listeners like you. Many of you have heard about the recent layoffs at NPR. We too are being hit hard by this financial crisis that has severely impacted our fundraising efforts. Only with your help, can we continue creating in-depth, documentary stories that reach 14 million people on-air and countless people online.

If every person who receives this email donates just $25,
it would greatly support our work through the next year. Your donation is tax-deductible.
This year, every penny you give is matched by the NEA, which has given a grant to launch our new series exploring the secret lives of girls around the world — girls and the women they become.

We are also working on a rich new collection of Hidden Kitchens including a look at Inauguration Day communal potlucks where Americans will come together over casseroles and onion dip to begin a new era in American politics.

We are in the midst of working to produce a Broadway musical based on our story about the first all girl radio station in the nation, WHER: 1000 Beautiful Watts. And we are collaborating with the Cabrillo Music Festival and conductor Marin Alsop on a multi-media project based on our secret life of girls series to premiere in 2012.

We are also continuing our successful internship and mentoring program for young people and workshops for emerging producers. Your donations make this work possible.

We would like to take this moment at year’s end to thank you for being part of our community. However you have participated, as a donor, interviewee, advisor, collaborator, listener ... we're grateful. We cannot do this work without your ongoing support.

We hope you will give what you can this year to help us in our efforts to build community through storytelling and to keep the media vital, relevant and human.

High Hopes and Peace in the New Year,

Nikki Silva & Davia Nelson
The Kitchen Sisters

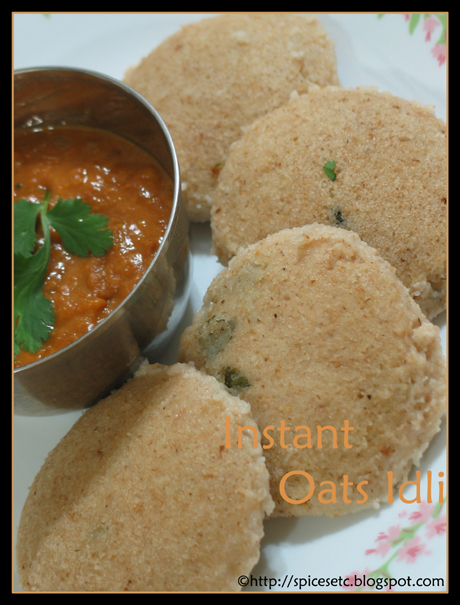
Instant Oats Idli


I tried Usha's Instant Oats idli and it was a success. I will definitely make it again and again. Check out her recipe here.

Makes 12 idlis

This is what I used:
Instant oats-2 cups
Semolina(sooji/rava)-1 cup
Salt
Hing-a pinch
Coriander leaves-chopped 1 tsp
Yogurt-3 cups
Baking soda-1/2 tsp
Some water(if necessary)
Oil to grease the idli plates

Method:
Dry roast oats for a minute and set aside.
Dry roast semolina for 3-4 minutes and set aside.
Grind the oats to a fine powder.
Mix oats powder with rest of the ingredients and make a batter.
Add some water if necessary. The batter should be very thick. Not like idli batter. It should be somewhat like cookie batter.
Grease the idli plates with little oil.
Pour the batter on idli plates with a laddle.
Steam for 10 minutes.
Cool for a couple of minutes.
Check if the idlis are cooked. If not, steam for 1 or 2 minutes.
Serve hot with sambar or chutney.

Usha says, once the oats powder and rava are mixed with yogurt, the batter should be used immediately for best results.

I did not season the batter as I wanted the idlis to taste like regular ones.

Thursday, December 11, 2008

Creamy Braided Bread

These are the super soft yet tasty bread as it's produced by the cream, milk and butter. I know it's a bit unhealthy as its contain lots of fat in there. Well, I've promised to myself will not make this so often. I've given away a loaf for my friend and left one for our breakfast.

This was my first attempt on making a braided bread, it looks very ugly. Unlike the one I read from the recipe book of 孟老师的100道面包. But, I'll try to make better next time if I found a chance to give away a loaf again :P
Other than the appearance, it taste really good with the soft texture and buttery flavour.
Recipe:
(A) 200g bread flour / 30g sugar / 1/4 tsp salt / 18g egg yolks / 3g yeast / 100g cream / 40g milk / 20g butter
(B) For the crumble toppings: 30g sugar powder / 50g plain flour / 5g milk powder / 40g cold butter
How I made it:
  1. Mix ingredients (A) except butter at low speed using a dough hook mixer, then turn to medium speed until it become a smooth dough.
  2. Add in the butter and knead with low speed until the butter combine with the dough. Turn to medium speed continue the kneading process until it become a smooth and elastic dough.
  3. Place the dough into a lightly grease bowl and cover with cling wrap to proof for 80 minutes.
  4. While waiting for the dough, mix the ingredients (B) with finger tips until it become crumbly texture. Set aside and ready to use.
  5. Divide the dough into 6 portions and round them into small balls. Let them rest for 15 minutes.
  6. Roll each dough into longish shape about 28cm and form a braiding. Tighten up both side of the dough and proof for 30 minutes.
  7. Egg wash the doughs and sprinkle over some crumble on the doughs. Bake at 180'C preheated oven for 20 minutes until golden brown.

Wednesday, December 10, 2008

BuildingGreen's Top-10 Products for 2008

Building Green points consumers and pros to a double fistful of great products to green your home.

There are several of interest to anyone contemplating a kitchen remodel:


FSC-certified Plyboo Pure bamboo flooring from Smith & Fong
This is the very best in bamboo flooring and as green as it gets for an imported product.

Natura Paint from Benjamin Moore
Who wouldn't want to use great paint without smelly after-odor? Natura uses Benjamin Moore’s own Gennex zero-VOC colorants. This great green paint is available as a primer as well as in flat, eggshell, and semi-gloss.

PolyWhey Floor Finish from Vermont Natural Coatings
PolyWhey is a water-based wood finish that uses recycled whey protein, a by-product of the dairy industry, as a binder. These LEED-qualifying, low-odor coatings contain no toxic heavy metals. They provide a clear coating with water, chemical, and scratch-resistance and with twice the durability of other waterborne finishes, according to the company, making them suitable for high-traffic residential and commercial areas. PolyWhey finishes dry to the touch in under two hours and fully cure in under a week. Available in gloss, semi-gloss, or satin finish.

Take a look at all ten products (I am really excited about the Matrix furnace for our home) and see what you can do to make your home more energy efficient and safely less toxic.

Low fat Dhahi Vada


Can you say no to low fat dhahi vadas? I cannot. When I first saw this recipe on Red chilli's blog (click here for the recipe), I thought it was a great idea to make dhahi vadas using kuzhi paniyaram pan. I bookmarked it immediately. Today I saw this recipe on Laavanya's blog (click here for the recipe). I couldn't stop myself from trying it out. This method hardly consumes any oil. But there is no compromise on taste. Vadas come out as soft on the inside and crunchy on the outside as deep fried ones. Many thanks to Red chills -the creator of low fat urud dal vadas :) and Laavanya for reminding me of the same. I combined both their recipes.

Ingredients:
To soak in water for 2 hrs and grind into a smooth paste adding little water(about 3tbsp)
Urud Dal-1 cup
Yellow mung dal-1/2 cup
Red chilli(optional)-1
Cashews-10

Other ingredients:
Green chilli-1 chopped finely
Ginger chopped-1/2 tsp
Salt
Hing-a pinch
Curry leaves-a few
Coriander leaves-a handful chopped
Pepper powder-1/4 tsp

For yogurt sauce:
Yogurt-2 cups
Salt
Red chilli powder- a pinch to sprinkle on top
Garam masala powder- a pinch to sprinkle on top
Coriander leaves-to garnish

Method:
Grind the soaked dals with little water to a smooth paste.
Add rest of the ingredients. Heat kuzhipaniyaram pan and put 2-3 drops of oil in each hole. Using a laddle, pour the batter on each hole. Drizzle 1 drop of oil on top of the vadas. Cover with a lid and let it cook on low flame for 2-3 minutes. Flip over and cook for 2 minutes or until they are done.

Mix all the ingredients listed under "ingredients for yogurt sauce". Tamper mustard seeds in oil and add it to yogurt sauce. Poke tiny holes on the vadas using a pin(this step is optional). Drop them in the yogurt sauce 1 hour before serving.


Note: You can grind coconut and green chilli together and add it to yogurt sauce for enhanced taste.
As Laavanya did, you can dunk the vadas in hot water, gently squeeze extra water and then put them in yogurt sauce.
Or you can even enjoy just plain vadas with coconut chutney.

Kitchen Treasure Hunt - Event Round Up Part 1

Kitchen Treasure Hunt - Event Round Up Part 1
A big Thank You, to all those who shared your treasures. This is the first time we are doing an event, and expected few participants. Suddenly on the last two days we received so many more! We now have 21 entries from bloggers and 2 from non-bloggers.


It has been an amazing time reading all the posts, and we did indeed discover so many treasures, not only from India, but also Indonesia, Japan, France, Cyprus, China. We have few antiques, traditional utensils, unusual one of pieces, as well as a few modern gadgets as well.

This is also the first time we can fully appreciate the efforts by fellow bloggers, who host events and do lovely round ups! We had a number of photos from the non-bloggers, and didn't want to leave out any. We found that doing one mega round up with with the capabilities of Blogger daunting. We therefore, decided to do two posts. This round up consists of entries from Non Bloggers. Part 2, will have the entries from bloggers.

Let us first take a look at entries from Shivashankari and Guhan. This young Bangalore based IT couple, do a lot of globe trotting, with gigantic cameras and photography gear slung around their necks! You can see some of their marvelous photos of a recent trip to Cambodia at my links. The treasures below including the ‘Guess What?’ were sent in from Shankari’s parents home in Chennai.

Shillu Katthi

For those who attempted the “Guess What?”, this is not a giant ear scraper or back scratcher! This is a 'shillu katthi'. It is, as some of you have correctly guessed, to do with a coconut, but not for grating! Notice how thick and heavy the handle is. This side is used to crack the coconut, while the other flowery end is used to pry out the kernel.

Aruvamane
This is a quaint looking ‘aruvamane’ or vegetable cutter. It is held steady, by placing a knee on the wooden board. Vegetables are then held with both hands, and slit against the sharp vertical edge. The serrated tip is used to grate coconut. This arvamane has decorative etching at the base.


Tenkuzhal and Sevai Nazhi
Tenkuzhal is dough that is squeezed into ribbons and deep fried to make a crunchy savoury snack. This one a is 'tenkuzhal nazhi'.

This on the other hand is a 'sevai nazhi' or a 'string hopper press'. Its a difficult task pressing strings through these perforations! You can see another type here.
The second non-blogger entry is from Malini and Savithri. They are from a joint family in Mysore, have a sprawling garden, and usually grow their own vegetables and fruits. They still use many of the traditional equipment in their daily lives. Those which are no longer used, have been creatively utilized in landscaping and interior design as you can see below!

Tool to remove the husk from the Coconut
Removing the husk from a coconut is not an easy task as can be seen here. Savithri’s husband is an engineer who designs and fabricates innovative machines and tools. He has fashioned this tool so that the coconuts from the garden can be dehusked easily by anybody. The coconut is impaled on the tip and held firm, while the lever is turned to separate the thick fibre. It is one of a kind, and that's why it does not have a name! Doesn't the first photo look like a robot straight out of Star Wars ?


Coffee Grinder
This is a very old traditional coffee bean grinder. It needs to be clamped to a surface and then used. Roasted coffee beans are freshly ground, after which the powered is used to make filter coffee decoction. More on coffee filters in part 2.


Aduppu
This simple equipment is a called an 'aduppu' or 'choolha', and can be used to light a fire for cooking.

Ammi Kal and Kuzhavi , Beesora Kallu, Ural
'Ammi kal' and kuzhavi, 'beesora kallu' and are used for grinding, powdering and so on, and are now used so innovatively to adorn their garden! Take a look at the pictures of the ones that are still in use at these links.
Ammi Kal and Kuzhavi – used for grinding chutneys


Beesora Kallu – used for grinding rice, ragi, wheat and so on, to make flours.
Water Trough, and an Iron Bandli
In the days, when water was drawn manually from the well, this large trough was used to store water to wash vessels. This has now become a safe sanctuary for seedlings, before they are big enough to be transferred to the ground or to pots.
The iron 'bandli' or pan was used for frying sweets and savories for large joint families. This has easily lent itself for a small rock garden!


Gangalam , Kodam, Ola Koodai
The largest vessel is called 'Gangalam', again used for large scale cooking. The one inside is a 'Kodam' used to store water, the one behind the Buddha an old 'Ola Koodai' or a straw basket.
Yet another large vessel decoratively used.

Aluminum Water Jug
This old Aluminum water jug, has been painted over and converted into a nice pot holder. Yelli Koondu
This is definitely not a cooking gadget, but a real friend in ancient kitchens, and hence it is in here! As many of you know, this is a old rat trap. This one is closed, but rest assured no rat inside! A 'Yelli Koondu' was a must in the 'ugrana ul' or storage room, where sacks of rice, lentils and all provisions were stored, and an easy target for mice and rats!
That's all for Kitchen Treasure Hunt - Part 1 folks! Hope you have enjoyed browsing this post, as much as we enjoyed posting it! Look out for Kitchen Treasure Hunt Round Up – Part 2 for all the treasures from bloggers!