Wednesday, September 17, 2008

Aval Dosai - Beaten Rice Pancakes

AVAL DOSAI - BEATEN RICE PANCAKES

Pichu Pati was a cooking wizard! She could efficiently cook a feast for a hundred people without any noise or fuss. She was a very slender and short lady and her deftness and speed was unimaginable. Whenever there was a feast at home, Pichu Pati was summoned for help. It never seemed as if she was hired help for the day, as she did her job with great devotion and love for our family. She had taught mother her trade secrets and had given her many of her hit recipes as well. One such recipe is making fluffy and marvelous Aval Dosai. Mother has been preparing this dosa ever since.

During one of our picnic outings to a nearby bird sanctuary (it was not buzzing with crowds, like it is in the present days) mother prepared hot aval dosais under the shade of the tall trees on the banks of the river. Though packing up the gas stove, the batter vessel, the tava and other knick-knacks was a wee bit of work, the experience of eating dosais, as we enjoyed the beauty of the gurgling of the river and the babbling of the fledglings in the bushes, is etched indelibly in our memories.

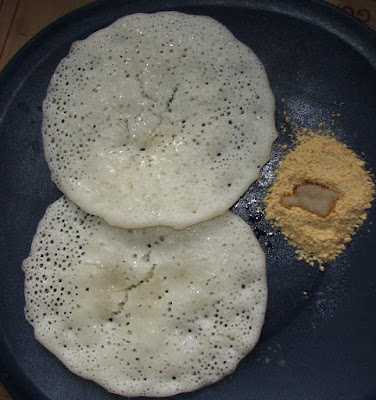
The photo below is of the aval dosai prepared by my mother during a recent visit.

INGREDIENTS:
Rice – 4 cups
Beaten rice – 1 cup
Sour curd – 1 cup
Salt – 1 ½ tsp

METHOD:
1. Soak rice and beaten rice for half an hour.
2. Grind them into a smooth batter adding sour curd in the end.
3. Mix in the salt and leave it in a warm place to ferment.
4. It takes at least 12 to 15 hours for the batter to rise.
5. When the batter is ready for use, heat a tava and rub it evenly with a drop of cooking oil. Using a halved onion to rub oil on the tava yields good results.
7. Once the tava is heated decrease the heat and pour one ladle of batter on it.
8. Help the batter to spread into a thick round dosa without applying too much pressure.
9. Dribble a little oil around the dosa and cover it with a lid.
10. Turning over is not necessary.
11. The dosa will look like a honeycomb with its numerous holes when cooked.

Enjoy with sambar or chutney or molaga podi or a vegetable korma. Kids love it drizzled with honey. Do not forget to top it with a fresh blob of butter.

Tuesday, September 16, 2008

Chiffon Cup Cakes 杯子蓝莓戚枫蛋糕

These is very light and tasty cup cakes with the combination of blueberry puree, whipped cream, custard and fresh strawberries. I followed a recipe book (不用模型做点心) which use a blueberry chiffon cake mixture to produce these cup cakes. As this cake is very light, you might need a slightly bigger cups to fill in the large amount of mixture to fulfill your appetite. It's great to have a cup of this after the dinner or as a refreshment in the afternoon.


Recipe from (不用模型做点心)

4 egg yolks
30g sugar
2g salt
1 tsp vanilla extract
80ml milk
60ml oil
135g plain flour
4g baking powder
6 egg whites
70g sugar
For the fillings:
40g blueberry puree, some fresh strawberries, 100ml whipping cream, custard and bluerry puree

Method:
  1. Whip the egg whites until peak form then slowly add in sugar continue whipping until a shiny and smooth consistency.

  2. In another bowl, mix egg yolks, oil, milk, vanilla, flour and sugar until everything combine.

  3. Add in 1/3 of the egg white mixture to egg yolks mixture(2) until combine. Then add half of the left over egg whites mixture. Then continue adding the remaining egg whites mixture. Slowly and gently combine everything.

  4. Gently mix in the blueberry puree to get a marble effects. Pour the mixture into each baking cups and bake for 20 - 25 minutes at 180'C.

  5. When the cake cool down, cut a hole at the center with a serrated knife and reserve the lids. Squeeze in some custard, whipped cream and blueberry puree. Finally, top with a strawberry and some blueberry puree then place back the lids.

  6. Keep in the fridge. It's nice to served cool.

Sunday, September 14, 2008

Napoleon Walnut Roll

Continue with the previous chapter - Mille Feuille, I made it into a Napoleon Roll by using a swiss roll sponge, custard, whipped cream, some chopped toasted walnut and the puff pastry. The texture was crisp from the inside and soft at the outside. The walnut had added a crunchy texture and the cream and custard had moisten up the entire roll.


Ingredients for the sponge: 4 eggs / 80g sugar / 67g plain flour

Method: Place the eggs and vanilla extract into a bowl. Gradually add in sugar and whisk until pale and thickened. Sift the flour into the bowl and fold together. Pour the sponge mixture into a baking tray with baking paper and bake for 10 minutes at 200'C preheated oven. Place the cooked sponge on a wire rack and place the sponge together with the wire rack into a plastic bag for cooling down. This is to keep the sponge moisture and much easier to roll up.

Ingredients for the fresh custard: 2 egg yolks / 133ml milk / 40g sugar / 13g flour / 1 tsp vanilla extract / 6g butter / 2 tsp Rum (optional)

Method: Mix the egg yolks with two teaspoon of milk in a bowl until well combined. Then, mix in the flour and make sure there is no lumps. Place the milk in a saucepan with vanilla extract and sugar, bring to the boil. Once the sugar dissolve in the milk, gradually pour onto the eggs mixture and stir then pour back into the pan. Return to the heat and using a whisk, lightly stir the mixture to thicken, do not boil. As the egg yolks warm, it will thicken to create custard. Keep stirring until it coats the back of the spoon. Remove from the heat and keep stirring and add in the butter. When the custard slightly warm add in rum. Pour the custard into a shallow bowl and cover with cling wrap. Place it into the fridge when it completely cool down and ready to use.

To assemble the roll:
  1. Spread the whipped cream onto the swiss roll sponge evenly. Divide the puff pastry into 3 longish shape portions (second picture).
  2. Stack a piece of the pastry on the sponge. Spread some custard on the pastry and sprinkle some toasted walnut (chopped).
  3. Stack another piece of pastry and continue like the step 2 until the last piece of pastry.
  4. Roll up the sponge with cling wrap and chilled in the fridge.
  5. Cut the roll with a serrated knife into 8 thick portions.