Wednesday, January 25, 2012

Podalangai Curry/Padavalkai Palya - Snake Gourd Curry


PODALANGAI CURRY/
PADAVALKAI PALYA  

Snake gourd is known as Podalangai in Tamil and Padavalkai in Kannada. Ayurveda and Naturopathy point out to the various health benefits of Snake gourd. Snake gourd is suitable for preparing delicious koottu, curry, morkuzhambu and other dishes. 
The addition of crushed pepper gives Podalangai curry / Padavalkai palya a special flavour. 


INGREDIENTS 


Snake gourd - 1 ( 4 cups when chopped )
Sesame oil - 1 tbsp
Mustard seeds - 1/4 tsp
Asafoetida -1 pinch
Peanuts - 2 tbsps
Coarsely crushed pepper - 1/2 tsp 
Cumin seeds - 1/2 tsp 
Curry leaves - a few 
Fresh coconut gratings - 2 tbsps 
Salt - 1/4 tsp

METHOD 

1. Chop the tender snake gourd into medium size pieces. 
2. Heat oil in a pan and add the mustard seeds. 
3. When the mustard seeds splutter add asafoetida. 
4. Throw in the peanuts and fry till they crack. 
5. Add the crushed pepper followed by cumin seeds. 
6. When the fried pepper gives out a pleasant aroma , add the curry leaves, chopped snake gourd and salt. 


7. Stir well, cover with a lid and cook on low flame. The tender vegetable will cook in its own juice. 
8. Stir once in a while till the snake gourd becomes uniformly soft. 
9. Open the lid, increase heat and gently cook the curry till dry. 
10. Switch off flame and mix in the fresh coconut gratings. 


 Enjoy the juicy and peppery Podalangai Curry / Padavalkai Palya with your favourite meal.

Tuesday, January 24, 2012

Getting there!


 The adorable assistant!

    Phil is back to "normal" working hours again since the family arrived home.  They are admiring the new look in their home.   The bamboo floors are about complete in the family room, making the room look warm and classy.  The fireplace will receive a new facelift, the final details will be taken care of and Phil will move on to the next lucky client.  We love happy clients and we love becoming like family to so many.  Keep watching for the final pictures!

Monday, January 23, 2012

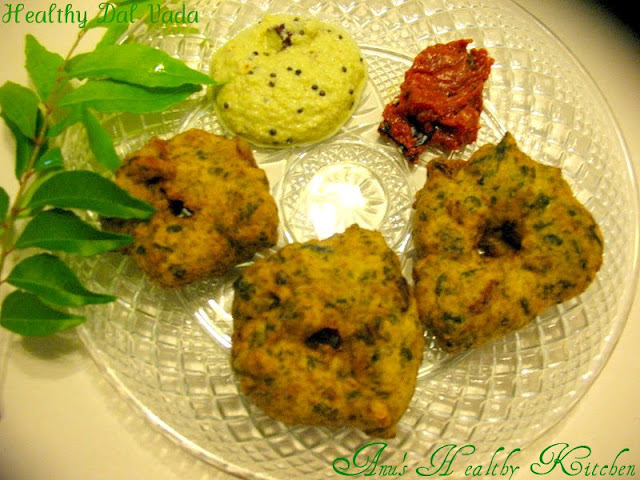
Healthy Lentil/Dal Vada with Collard Greens, Urad and Moong Dal


This is a deep fried recipe which usually I prefer to avoid as much as possible. When I decide to deep fry then I make sure that the focus is over the ingredients being more healthy, in that way I don't feel guilty about eating it once in a while. I know we should not feel guilty about eating deep fried food once in a while but keeping it healthy gives a lot more satisfaction and happiness. Another reason I added greens to the recipe is because Mom always used to make dal vada with drumstick greens and we used to love it. Well we used to eat with a odd combination, with mutton curry....but believe me or not it tasted so good.

Ingredients:
------------
1 cup Urad Dal
1 cup Yellow Moong Dal
2 cups Collard Greens (I used frozen and thawed)
2-3 Green Chilies chopped
1/4 inch Ginger chopped
1 Sprig Curry Leaves
1 Onion chopped
Salt to taste

Method:
---------
1. Soak Urad and moong dal in water for about 2 - 3 hours.


2. Drain the water and save it for later. 
3. In a kadai add oil for deep frying and bring it a medium-high heat.
4. Meanwhile in a mixer/blender add the dal, green chilies and ginger, give it 3-4 pulse until the dal is slightly coarse paste.
Note: We don't need to add water as the collard green are frozen and will have lot of water in it. If you are using fresh greens then you can add the water in which the dal was soaked.


5. Now add the greens and curry leaves and grind it to a coarse paste, I just pulsed few times, in between scraped the sides and got the desired consistency. 
6. Transfer this dla mixture into a large bowl.
7. Meanwhile sprinkle salt over the onions and mix a little bit and keep it for about 20 mins.
8. Now squeeze the water from the onions. 
Note: This will remove the excess water from onions, so that when we make the vada it stays crispy and does not get soggy.


9. Add the onions to the dal mixture and mix well and check for salt and add more if you need.
10. I reserve the water in which dal is soaked, for dipping/wetting my hands to make vada shapes.
Note: Make sure that the oil is ready by dropping a small drop of the thick vada batter. If it rises as soon as you put into the oil, it means the oil is ready, else if it stays at the bottom of the kadai and takes time to come up to the top, then you need to wait few more minutes.
11. Now add the vadas one by one slowly and make sure you don't over crowd the kadai. Cook each side for about 5 mins or until it turns golden brown.
12. Flip once to the other side and cook again for about 3-4 mins. 
Note: Make sure you don't flip too many times as the vada will absord more oil and will not cook properly.


13. Remove the vadas to a plate lined with paper towel, so that it will remove the excess oil.


14. Repeat the steps 11-13 until all the batter is used.


15. I served these vadas with Coconut Chutney and Spicy Tomato Pachadi.

You Might Also Like: