Sunday, January 06, 2013

How to make Paneer / Homemade Paneer / Homemade Cottage Cheese


Most of the time, I use paneer purchased from store for preparing paneer based recipes. Only when I get time or if extra milk bottles/packets are available, only then I go for home made paneer. Since paneer preparation is considered too easy, until now I never thought of posting it in my blog.


Later, one day, I prepared paneer butter masala using home made paneer and packed it for lunch. When I shared it with my team members, they all liked it very much. Many in my team, who are very fond of eating paneer actually are not aware as how it is prepared. So, now I have decided to post a simple method of preparing paneer. Hope this how-to helps many to prepare a low fat fresh paneer at home.


Basic Information:

Preparation Time: 15 minutes

Idle Time: 2-3 hours

Makes: 1 and 1/4 cup cubed paneer


Information:


Milk - 1 and 1/2 liters (I used 4% fat milk)

Lemon Juice - 2 tablespoon (See notes)


Method:


1) Take a wide pan and heat milk in it.

2) When the milk is gently boiling, reduce the flame and add the lemon juice slowly. Based on the citric taste in the lemon, you might require more or less lemon juice till the whey separates from the chenna. Make sure the milk is not vigorously boiling. At the end, you can see clear whey separated from chenna.


3) Using a muslin/cheese/clean white cloth, filter the whey from chenna. Make sure your cheese cloth is large enough to hang it.

4) Wash the chenna in running cold water for 2 minutes. It helps in removing the citric taste from it. Put a knot to the cheese cloth and hung in the kitchen counter or just above your sink.

5) Let it be for 30 minutes.


6) After 30 minutes, squeeze the extra water using your hand.

7) Place this in a plate/bowl and put a reasonably heavy weight on it. I used my cutting board and on top of it, I kept an empty hot pack. Make sure not to put very heavy weight on it, otherwise the paneer becomes hard.

8) Keep it aside for 2-3 hours. However this duration might vary based one the weight you used for pressing the paneer. Heavier weight quickens the paneer preparation. However, one has to check the firmness at random intervals .

9) After 3 hours, cut the chenna into cubes or as per your desired shape.

10) Use immediately or store it in a zip lock bag or in a container and refrigerate it till you use it future for any gravy.


Notes:

1) You can also use sour beaten curd instead of lemon juice. You might require more curd and based on it, the taste and colour of the paneer differs. I tried once using curd but it didn't suit my taste. The above method suits me best.

2) You can use the whey in making gravy if you prefer. Most of the time I discard it as I always use lemon to make paneer.

3) The amount of paneer depends upon the fat content in the milk. I got 1 and 1/4 cup of cubed paneer from the quantity of milk I used.

4) Until now, I never stored home made paneer for more than 5 days. So I am not sure about the shelf life after 5 days. Try to use within a week of preparation.

5) If you use, lemon juice from concentrate, you might require additional one or two tablespoons to curdle the milk.


Click here to see the list of paneer dishes prepared by me.

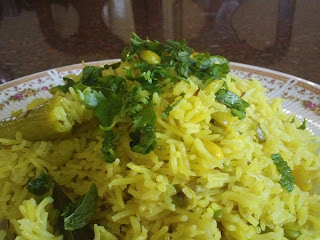
Kaalu Pulav - Field Beans Cooked With Rice And Spice

KAALU PULAV 


When my children were still in school, Christmas holidays were filled with great fun and excitement. Inspired by the pleasant weather my husband came up with sudden picnic ideas which thrilled the children. Some times it would be to a definite picnic destination, and some other time it used to be a pleasant long drive on the state high way where in we explored new places of our own for picnicking. Though we liked carrying various Christmas goodies from Nilgiris, and a crate of Fanta from B.G.C.,we always preferred home cooked food for the main course. Since Kaalu was always handy during that season, many a time Kaalu pulav with a raita was voted for as our  picnic lunch.

 INGREDIENTS 


Basmati Rice - 2 cups 
Field beans/Kaalu - 1 cup 
Salt - 1 tsp 
Onion ( peeled and chopped lengthwise)- 2 tbsps 
Green chillies ( Slit )- 2
Fresh ginger ( Peeled and chopped lengthwise ) - 1 tbsp 
Cumin seeds - 1/2 tsp 
Pepper - 1/4 tsp 
Cinnamon 1'' stick  - 2 numbers 
Cardamon - 2 
Cloves - 6 
Turmeric powder - 1 pinch 
Sesame oil - 2 tbsps 
Curry leaves - a few 
Finely chopped coriander leaves - 2 tbsps 
Finely chopped mint leaves - 2 tbsps 

METHOD 

1. Wash and drain the rice and keep it aside. 
2. Heat oil in a heavy bottomed kadai. 
3. Add cumin seeds, pepper corns, cinnamon, cloves and cardamom and fry till they pop up. 
4. Add curry leaves, chopped onion, slit green chillies and ginger and saute till onion becomes pink in colour. 
5. Stir in  Kaalu


6. Add turmeric powder and then the washed and drained rice and fry till the rice starts sticking to the kadai
7. Add salt and 4 cups of water to the fried ingredients and stir well. 
8. When the water starts to boil, cover the kadai with a lid and reduce flame to sim/low. 
9. Open the lid after 15 minutes and stir the Pulav carefully (without mashing up the rice) for the even distribution of Kaalu  and cover it again. 


10. Switch off flame after five more minutes and your fragrant Kaalu Pulav is ready in 20 minutes. 
11. Shower the Kaalu Pulav with finely chopped fresh coriander and mint leaves just before packing/ serving. 


Enjoy the flavoursome Kaalu Pulav with onion and tomato raita.

Saturday, January 05, 2013

Kaalu Paruppadai - Field Beans And Lentil Pancake

KAALU PARUPPADAI  

 Paruppadai has become our regular breakfast dish because of its low G I. Onion Paruppadai,  Cabbage Paruppadai  or Paruppadai with  fenugreek leaves taste delicious when savoured hot. One Adai is sufficient to sustain my husband till he finishes one round of his 18 hole golf game. Since it is Kaalu season Paruppadai with kaalu has become a regular feature on our breakfast menu. 


INGREDIENTS 


Field Beans/Kaalu - 1 cup ( cooked ) 
Bengal gram dal - 1 cup 
Split yellow pigeon peas/ Tur dal - 1 cup 
Split black gram dal - 2 tbsps 
Salt - 1 tsp 
Ginger - 1'' piece 
Red chillies - 4 
Chopped onion - 1/2 cup 
Cumin seeds - 2 tsps 
Asafoetida - 1 pinch 
Curry leaves - a few 
Chopped coriander leaves - 2 tbsps 
Sesame oil - For cooking

METHOD

1. For an early breakfast soak Bengal gram dal, Tur dal, Black gram dal and red chillies overnight. 
2. Next morning drain and grind the soaked ingredients with salt, asafoetida and peeled fresh  ginger into a very coarse and thick  batter with out adding water. Add cumin seeds and run the mixer for half a  minute more.
 3. Mix chopped onion, precooked Kaalu, Chopped coriander leaves and the curry leaves into the batter. 


4. Heat a greased tava and place a ball of batter on it. 


5. Using your wet fingers pat the batter gently and spread the Adai into a thick circle. 
6. Make a hole in the center and add a drop of oil into the hole. Dribble little oil around the Adai and cover it with a lid. 


7. Cook on medium flame for two to three minutes, open the lid and check if the batter looks cooked on top. Lift it up lightly and check if the bottom of the Adai has turned golden brown. 
8.Flip the Adai and cook for one more minute dribbling few more drops of oil around it.
9. Remove when done and serve immediately.
Take time to chew the delicious Kaalu Paruppadai and enjoy it with coconut chutney or any gojju. My friend loves to relish Paruppdai with Avial


 I prefer it as it is  with a blob of butter on top of it !