When it comes to remodeling your kitchen, there are things you can do in advance to prepare yourself for the wonderful transformation.
1.) Plan, and discuss with your contractor, the location of your temporary kitchen. The kitchen is the "heart" of the home, so to speak, and finding a temporary location is very important to ensure your comfort during your remodeling.
2.) Pack up your kitchen items a few weeks before the project begins. Pack up items that you will not be using in your temporary kitchen and keep aside the items you know you will use. Box and label your items so you can move it back it to your new kitchen when renovations are complete! It will save time and allow you to start using your new kitchen right away.
3.) Decide on a place for the delivery of the materials and appliances. Garages are usually a #1 choice because they are secure and spacious. If this is your choice, be sure to prepare and make space in your garage.
4.) If you have pets, and are afraid they will get in the way, plan where you want your pets to spend thier days. Perhaps you will have to keep the cats in the bedroom and the dog in a crate. You want to be sure that they are safe at all times and not in the way of the installers.
5.) Choose a location for the installers to store their tools.
6.) Make a list of your favorite restaurants and take-out places! You can take this time to explore new places!
7.) Ask questions along the way! This is a time where you can feel anxious for your new renovation, so be sure to communicate any questions you may have as things come up!
Thursday, August 06, 2009
Uppittu,Paruppu Vadai, Godhambu Pradhaman for Avani Avittom
Yesterday I posted the pictures only. I am posting the recipe in twp parts. The main menu will follow in the next post. Here are the recipes of the festive specials.
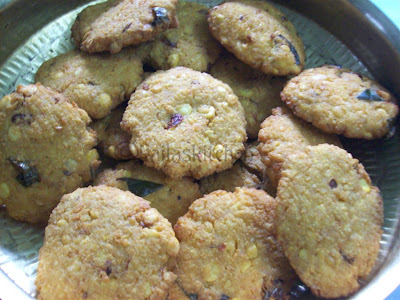
For avani avittom, in both our families, its customary to make parupu vadai ( Chana dal fritters), Uppittu and Pal Payasam (Milk and rice kheer). Paruppu vadai is the popular masala vadai minus the onions/garlic in it. When vadai is made as prasadam/offering, onion/garlic is not included. We don't use onions in any cooking on those days. Also if any Brahmacharis(Bachelors) are there in the house, neiyappam is also made. Sine my husband is not very fond of pal payasam (Read he will taste only a teaspoon), I decided to make some pradhaman. Since chana dal is the star ingredient in both the other dishes, I went for godhumbai(cracked wheat). I am giving the measurements that I prepared for the day.
Paruppu Vadai/Aama vadai
Yields - 20 nos
You need
Wash and soak the three lentils together for 1 hour along with the red chillies. Drain and leave it in the colander for few minutes so that the water is drained fully. Reserve 2 tablespoons of the lentils. Grind the lentils in the mixer to a coarse paste. You may not require water at all, since the lentils are moist enough. Stir in the reserved lentils to the ground batter. Add finely chopped chillies,curry leaves, salt and hing powder. Mix well. Don't allow the batter to sit for long. Its recommended to make the vadas immediately else it will drink lot of oil on frying.
Take a gooseberry sized batter and make into a ball. Use banana leaf or greased zip lock cover. Place the batter on it. slightly press it down using the palm. The shape will resemble that of the tortoise hence the name aama vadai.
Heat oil in a kadai. When it is hot, slowly slide the vadai into the oil. Take care not to splash the oil while sliding. You can make 4/5 in a batch depending on the frying pan and the amount of oil used. After 3 minutes or so, gently flip them so that the other side is also cooked. I follow my mom's method while frying vadas. When the vadas are half cooked, I drain them. Continue with the second batch and drain them too when its just golden in color. Then I re-fry the the first batch till it is golden brown. The two step process ensures more crispness and the inside too will be well cooked.


For avani avittom, in both our families, its customary to make parupu vadai ( Chana dal fritters), Uppittu and Pal Payasam (Milk and rice kheer). Paruppu vadai is the popular masala vadai minus the onions/garlic in it. When vadai is made as prasadam/offering, onion/garlic is not included. We don't use onions in any cooking on those days. Also if any Brahmacharis(Bachelors) are there in the house, neiyappam is also made. Sine my husband is not very fond of pal payasam (Read he will taste only a teaspoon), I decided to make some pradhaman. Since chana dal is the star ingredient in both the other dishes, I went for godhumbai(cracked wheat). I am giving the measurements that I prepared for the day.
Paruppu Vadai/Aama vadai
Yields - 20 nos
You need
Chana dal/Kadala paruppu - 1 1/4 Cup
Tuvar dal - 1/4 C
split urad dal - 1 tblspn
Red chillies - 3 nos
Green chillies - 2 nos
salt
curry leaves
Hing - few shakes
Oil to deep fry
The measurements need not be accurate. Approximate measurements will work too. This is just an indication of the proportions of the various dals used. Also adjust the green and red chillies according to the variety used. You should not feel the heat of the chillies too much while eating it.
Wash and soak the three lentils together for 1 hour along with the red chillies. Drain and leave it in the colander for few minutes so that the water is drained fully. Reserve 2 tablespoons of the lentils. Grind the lentils in the mixer to a coarse paste. You may not require water at all, since the lentils are moist enough. Stir in the reserved lentils to the ground batter. Add finely chopped chillies,curry leaves, salt and hing powder. Mix well. Don't allow the batter to sit for long. Its recommended to make the vadas immediately else it will drink lot of oil on frying.
Take a gooseberry sized batter and make into a ball. Use banana leaf or greased zip lock cover. Place the batter on it. slightly press it down using the palm. The shape will resemble that of the tortoise hence the name aama vadai.
Heat oil in a kadai. When it is hot, slowly slide the vadai into the oil. Take care not to splash the oil while sliding. You can make 4/5 in a batch depending on the frying pan and the amount of oil used. After 3 minutes or so, gently flip them so that the other side is also cooked. I follow my mom's method while frying vadas. When the vadas are half cooked, I drain them. Continue with the second batch and drain them too when its just golden in color. Then I re-fry the the first batch till it is golden brown. The two step process ensures more crispness and the inside too will be well cooked.
Uppittu
Uppittu is similar to Boli. The making process is almost the same. My mom uses moong dal for the stuffing and my MIL goes for chana dal. And I followed MIL. With some planning ahead, you can make sure, you are not left with excess of the filling/outer covering dough. I divide both the dough and filling into four parts and make equal no of balls from each so that everything gets used up and adjust the size accordingly to make up for the excess. The yield numbers may vary depending on the size you make. I got 20 nos.
For the outer cover
Wheat flour - 2 1/2 Cups
Turmeric = 1/2 tspn
Salt a pinch
Ghee/Gingely Oil - 4 tblspn
Water to make the dough.
Prepare the dough with all the ingredients mentioned above. You can add more oil/ghee to make it soft.Prepare the dough at least an hour before. The longer the dough sits, the softer the uppittus be.
For the filling
Chana dal/kadala paruppu - 3/4 cup
Powdered jaggery - 1 1/2 cups
Grated coconut - 1 1/2 cup
Ghee - 2 tblspn
Pressure cook chana dal till soft. Drain the cooked dal and grind it along with powdered jaggery and finally add grated coconut and pulse for few seconds to blend everything. Heat a kadai and a tablespoon of ghee. Tip off the ground mix into the kadai. Keep stirring till it turns dry. You can add some ghee while stirring to avoid sticking to the kadai. Leave it to cool.
I use banana leaves to make the uppittu. Moist your fingers with little ghee. Take a ball of the outer covering. Pat into a small circle and keep the filling on the centre and fold the edges to cover it. Shape into a ball again with the filling inside and again pat it with your fingers to a circle. Don't make it too thin. This is slightly thicker when compared to Boli.

Heat a tawa and place the banana leaf with the uppittu on the down side. After few seconds, you can slowly,lift the leaf apart. Cook both sides. Since we had added enough ghee/oil in the dough you may not require much ghee to cook them. Remove from the pan and fold it. This can be eaten by soaking in cardamom flavored milk, though it tastes good as it is.

Godhumai/Cracked wheat pradhaman

You can find godhumbai pradhaman recipe here. This time I used fresh coconut milk from a relatively big coconut and cracked wheat. In the earlier post, I used wheat rava.
Wednesday, August 05, 2009
Milk Crisp Buns 奶酥面包
 I've no idea how to translate 奶酥面包 to English, kindly advise, thanks! I find this recipe is quite different which is using 汤种 method that I named it "water dough", please correct me if I'm wrong. The whole recipe books of 65C度汤种面包 is using this water dough formula which I find it's quite interesting and hope it turns out soft and nice.
PS: Just noticed it's translated as "water roux" and the bun named as Milk Crisp Bun. Many Thanks to MH
 I'm quite happy with this formula as the buns turn out really soft. This 汤种formula came from the Japanese according to the book. It needs to be prepared with a water dough that using water and bread flour to cook until 65C and cool down before adding it into all other ingredients for kneading. This would definitely took some time but worth it! I like the buns very much as well as the milky fillings which contains quite a lot of milk powder. There are few buns that I didn't seal it tightly ended up it burst out during the baking. Yes, I need more practice :P I don't have enough dessicated coconut so the last bun topped with sesame seeds. It looks like an alien sitting with others bun that topped with desiccated coconut. I've try out another water dough of bread which is another good attempt and will definitely share with you here on next posting.
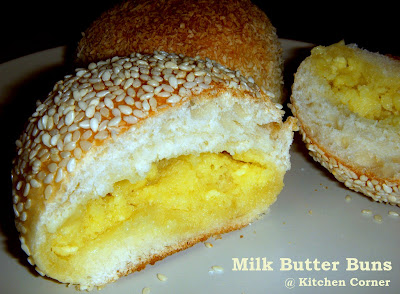
Recipe for the water dough "water roux": Cook 250g water with 50g bread flour at medium low heat, keep stirring until it become thicken and no lumps left. If you've a candy thermometer, measure it until the temperature turn to 65C then turn of the heat. I didn't measure it with thermometer, so I cook it until like a baby porridge. Transfer to a clean bowl and cover with a cling wrap to avoid skin forming. The amount of water dough here would be more than a recipe required, you could store it in a the fridge for 2 days, if the color turn to dark grey, feed the bin :P OK OK don't waste it, use it for making other doughs before it turn to dark grey color OK!
Recipe for the 9 buns (approximately 60g for each dough): 210g bread flour / 56g plain flour / 20g milk powder / 42g caster sugar / half teaspoon of salt / 6g yeast / 30g beaten eggs / 85g water / 84g water dough / 22g unsalted butter
Recipe for the fillings: 70g butter / 30g sugar powder / 1/8 tsp salt / 30g beaten eggs / 1 tsp corn flour / 80g milk powder
Methods:
- Put all the buns ingredients for kneading until smooth and elastic and the dough no more sticking at the side of the mixing bowl. Let it proof for 40 minutes in a clean bowl cover with cling wrap.
- For the fillings, beat the butter with sugar until light and pale. Gradually add in the beaten eggs. Mix in the corn flour and milk powder with a spatula until everything well combine. Do not over mix. Divide each dough with an ice-cream scoop and place on a plate lined with greaseproof paper. Let it chill in the fridge until needed.
- Divide the dough into even size of 9 portions and shape it into smooth ball shape. Let is rest for 10 minutes.
- Flatten each dough with your hand and wrap the filling into the dough. Seal it tightly.
- Prepare some water on a clean plate and place a kitchen towel on the top. Damp the surface of each dough and run the damp surface around a bowl of desiccated coconut. Place on a baking tray and let the dough proof for 40 minutes.
- Bake at 180C for 15 minutes. Enjoy!
Subscribe to:
Posts (Atom)


