Thursday, May 26, 2011

Manga Rasam - Raw Mango Soup

MANGA RASAM

Once again it is mango season. It is time to include mangoes in almost all the dishes prepared for a full meal. Pickles, curries, salads, dals, sambar, morkuzhambu and chutneys, mango rice, sweets like halwa and payasam prepared out of ripe mangoes - the list of mango based dishes is endless. At least one mango dish a day, is the order of the day, as long as the season lasts!
Here is a recipe for Rasam which is an integral part of a South Indian meal - prepared with raw mango.


INGREDIENTS

Raw mango chopped - 1 cup
Tur dal - 1 cup
Turmeric powder - 1 pinch
Powdered jaggery - 1/4 tsp
Salt - 1 1/2 tsps

INGREDIENTS FOR RASAM POWDER

Coriander seeds - 1 tbsp
Red chillies - 5
Black pepper - 1/2 tsp
Cumin seeds- 1/2 tsp
Fenugreek seeds - 1/4 tsp
Asafoetida - one small piece
Curry leaves - a few

FOR SEASONING

Ghee - 2 tsps
Mustard seeds - 1/4 tsp


FOR  GARNISHING

Fresh coriander leaves ( chopped ) - 1 tbsp

METHOD

1. Wash and chop mango with peel and pressure cook with dal and turmeric powder adding 3 cups of water.
2. Heat one drop of ghee in a pan and fry asafoetida.
3. Add coriander seeds , pepper, cumin seeds, fenugreek seeds and red chillies and roast together till it emanates a very pleasant aroma.
( If asafoetida powder is used, add it just before the curry leaves ).
4. Lower the flame and add curry leaves and roast till they become dry.
5. Allow to cool and powder the roasted ingredients and keep aside.
6. Mash the cooked dal and mango retaining a few mango pieces as they are.
7. Add salt and jaggery and boil till they blend with the cooked dal mango mixture.
8. Add rasam powder and wait till it starts boiling.
9. Immediately add 500ml of water in a slow stream, holding the water jug high up , so that the rasam is topped with foam.
10. Lower the flame and add coriander leaves.
11. Cover with a lid and allow the rasam to gather more foam on top.
12. Switch off flame when the raam is just about to boil. Over boiling will kill the pleasant aroma of rasam.


13. Heat ghee in a seasoning ladle and add mustard seeds.
14. When the mustard seeds splutter add the seasoning to the rasam.


Enjoy the flavoursome Manga Rasam with hot rice topped with a spoon of pure ghee or  relish  the tangy rasam sip by sip from a tall glass topped with a dash of ghee.
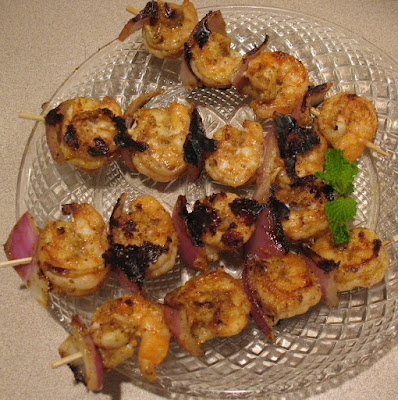
Grilled Shrimp Skewers

Seafood is my every time favorite and when it's grilled you cannot believe the flavor just pops up and clicks your brain and with a touch of lemon it's awesome. I always loved eating grilled food, because it's more flavorful and easy.


I marinated the shrimp with a simple ingredients and after I took it out of the grill pan I sprinkled with some lemon juice and paired it with a papaya salad.
I used a indoor grill pan, you can use outdoor grill or any grill that you have or just do it in a wide pan or just broil it in the oven by placing a cookie sheet under the skewers, so that the drippings will stay on the pan and in this way you can avoid the mess in the oven.

Ingredients:
------------
1 lb Shrimp, shelled, de-veined and cleaned
1 Red Onion cubed 
1 tsp Red Chili powder
1/4 tsp Turmeric powder
1/2 tsp Curry powder
1/2 tsp Cumin powder
Salt and Pepper to taste
1 tsp Olive Oil
1 Lemon, juice squeezed out of it

Method:
---------
1. In a bowl add the cleaned shrimp, make sure that you shake of the water, else it will become watery while grilling.
2. Add all the ingredients except the lemon juice and marinate it for about 15 mins.
3. Insert the shrimp and onions alternatively into each medium size skewers. Make sure you don't overcrowd the skewer, as the shrimp will not have enough space to cook.
4. Place a grill pan and when it's hot arrange the skewers, and cook the shrimp for about 3-4 mins on each side or until you get some nice grill marks and the shrimp turns into pink color.
5. Arrange the shrimp skewers into the serving platter and squeeze the lemon juice and serve it immediately.
6. I served this with Latin Papaya Mint Salad (Click on the link to view the recipe), you can serve with you choice of sides or rice or noodles or salad or soup, or anything that you think will go well with this grilled shrimp.


Sending this recipe to event:


Ayeesha - Taste Of Pearl City - Event Name: Any one can cook and Event: "Serve It - Grilled" hosted by Krithi and Denny


How To Cook Perfect PASTA


The BA Pasta Manifesto

1. Forget the pot. Use a pan.
 Ever notice that the pasta you get at top-flight restaurants is different from what you make at home? It's glossy and luxurious, each strand of pasta coated with sauce. The key to pasta this transcendent is a sauté pan. That's what the pros use to cook almost-done pasta and sauce together—until there's pomodoro clinging to every bite of bucatini, until each raviolo is lacquered with sage-flecked brown butter. It's a unified, flavor-packed dish, not a bowl of noodles with a bunch of sauce dumped on top. To make your own restaurant-worthy pasta, grab a sauté pan (use one that's either 10" or 12" in diameter) and get started.

2. Build the Foundation. At its most basic, a pasta sauce requires just a handful of ingredients and 20 minutes of cooking time. To make a classic pan sauce, heat olive oil, sauté garlic, add a vegetable or two and then—here's the important part—a generous amount of pasta water. The starchy water and oil simmer together, forming the foundation of a sauce. We love a long-simmered ragu, but this is the technique we return to again and again.

Related: Bon Appetit's Favorite Pasta Recipes

3. You're not using nearly enough salt. Add a small handful of kosher salt to a pot of boiling water, then drop in the pasta. The noodles absorb water as they cook, so you're actually seasoning the interior of an otherwise bland starch. Mark Ladner, executive chef at Del Posto in New York City, says the water should taste "almost as salty as seawater." For Ladner, that's about 1 Tbsp. salt for every quart of water, but you don't have to be so particular—just throw it in there.

4. Don't dump the pasta water. Starchy, salty pasta water is the secret ingredient in most sauces. Scoop out some of the cloudy water (it's supposed to look like that) with a coffee mug or measuring cup, and pour a few splashes into the sauce. Save the rest; you might need more than you'd expect. Then simmer until the water and oil emulsify and begin to form a slightly creamy sauce. It's a little like deglazing a pan with stock or wine, a simple step that gives a dish body and flavor.

5. Trust the Tongs. While the pasta is cooking, grab a pair of basic metal tongs (12" ones are best for pasta prep). They are an indispensable tool: Use them to pick up a noodle to test for doneness, to transfer long noodles from pot to pan, to toss noodles in sauce, and, finally, to plate it all beautifully.

6. Now work that pan. It's where the magic happens. Bringing it all together in the pan is as easy as it is important. Undercook the pasta by about two minutes (you should see just a hint of white when you bite into a piece) and finish cooking it in the sauce's flavorful liquid. To coat the pasta with sauce, try some fancy restaurant fry-pan flips. Or, if you don't feel like cleaning the range after dinner, use tongs as if you're tossing a salad until the pasta is completely coated. Keep an eye on the sauce: Is it too tight? Remove it from the heat and add a bit more pasta water. Too brothy? Let it cook 20 seconds longer. Just remember that the pasta will continue to absorb the liquid and the sauce will thicken off the heat: What's loose in the pan will firm up in the bowl.

See Also: The Best Meatless Main Courses

7. Everything's Better with butter. The other secret to rich, silky sauces is extra fat—and yes, all the restaurants use it. "I finish the pasta with a little bit of olive oil, butter, or both," says Andrew Carmellini of New York City's Locanda Verde. "In Italian it's called mantecare, which means 'to make creamy.' " He adds cold butter to the pasta and sauce in the pan, off the heat, to give it an unctuous texture.

8. Cheese is not just a garnish. Whether you know it or not, restaurants enrich pasta sauces with cheese even before grating it tableside. When a little bit is added to the sauce, it melts and becomes a binder, a stealth ingredient that lends texture and flavor. Here are three simple steps to getting the most out of it: Skip pre-grated cheese. It's more expensive and it doesn't taste as good. Grate it finely so it'll melt easily into the sauce. You're making pasta, not a quesadilla. Think beyond Parmesan. Frank Falcinelli and Frank Castronovo, of New York City's Frankies Spuntino, use Pecorino, a sheep's-milk cheese with a tangy bite. "It has a stronger flavor," Castronovo says, "so we use less of it in the food."

9. It should looks as good as it tastes. Like a wineglass, a well-designed pasta bowl not only makes for beautiful presentation but also serves a purpose. A broad bowl with high sides keeps food warm (especially if you heat the bowl in an oven first), and a white one makes the colors in the sauce pop. We like Crate & Barrel's Bistro Large Bowl ($7; crateandbarrel.com). Use your trusty tongs for plating. "It should look like a bird's nest," says Thomas McNaughton, executive chef at San Francisco's Flour + Water. To get the look, twirl the pasta, lift it out of the pan, lower it into the bowl, then re-twirl.

10. Practice Makes Perfect Now that you've learned the principles of great pasta, practice the technique on these four classic recipes.